|
Creating a Table |
  
|
Creating a Table
|
Creating a Table |
|
Overview
A Local Database consists of one or more tables which are created in the "Local Database" module. The structure you create here is meant to be replicated within the device so it stores application data.
If If required, you can encrypt the local database so that the stored application data can only be viewed/used within the device that has the MCL application installed. See Local Database Setup.
![]()
A table must be well structured. Editing a table's properties, later on, results in the loss of data already inserted into the table.
To Create a Table
There are two ways to create a table.
•Directly in the "Local Database" module:
a. Right-click the name of the local database and select "Add Table". This option is ONLY available to create the initial table.
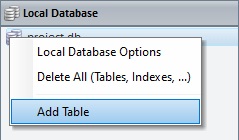
b. Right-click the "Tables" section and click "Add Table" in the resulting menu.

![]()
Another alternative is to duplicate an existing table - right-click the table you want to duplicate and select "Duplicate Table". The duplicate table will have the same name with an incremented number.
Be aware that this ONLY duplicates the table's structure, meaning, the existing fields and their defined properties NOT any stored data.
OR
•Click ![]() in whatever window it is available in (the properties window of most of the Local Database processes).
in whatever window it is available in (the properties window of most of the Local Database processes).
Whatever the method used, it opens a properties window which allows you to create/set up a table.

Step-by-step
1. In the "Table Settings" section, enter a name for the new table. The suggested name is "Table" with an incremented number.
2. Fill in the "Fields" table:
Fields |
|
Name |
Enter the name of each required field. By default, you are provided with a field name suggestion ("ID") but it can be edited/replaced. |
Type |
Select the data type for the field from the drop-down. |
Default |
If required, enter a default value for the field. |
Primary Key |
If you want a field to be a primary key, check the corresponding box. |
Auto-Increment |
If you want the value of a primary key field to increment automatically, check the corresponding box. |
![]()
If you intend to use the "Auto-Increment" setting in a table, consider the following:
•It can only be used in an 'Integer' type field.
•It must be unique within the table (only one field can be checked as "Auto-increment").
•If you define a field with "Auto-Increment", it automatically becomes a primary key and you will not be able to define any other fields as Primary Keys.
•SQLite does not recommend the use of the AUTOINCREMENT attribute.
3. Use the icons to the right of the table to add (![]() ), delete (
), delete (![]() ) or move (
) or move (![]()
![]() ) the selected fields.
) the selected fields.
4. As an option, check "Keep Data content when Deploying" to ensure the sending of data along with the database structure. As a result, the data will be available when you upload the project to the device, use MCL-Simulator and/or MCL-Tracer to test/analyze the project.
![]() Ensuring data delivery is not very useful at a business logic level because an application handles values that change over time (ex: item lists, product price lists, client lists, etc.) but it can make sense in a development context or, for instance, when defining a table containing an application's exception errors (values that do not change with time).
Ensuring data delivery is not very useful at a business logic level because an application handles values that change over time (ex: item lists, product price lists, client lists, etc.) but it can make sense in a development context or, for instance, when defining a table containing an application's exception errors (values that do not change with time).
5. Click ![]() to conclude.
to conclude.
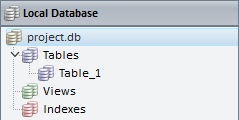
The new table is displayed in the "Tables" section of the "Local Database" module.
![]() If required, you can use Drag-and-Drop to reorder the existing tables.
If required, you can use Drag-and-Drop to reorder the existing tables.