|
Creating an RFID Profile |
  
|
Creating an RFID Profile
|
Creating an RFID Profile |
|
Process Purpose
To use the RFID feature, it is necessary to create profiles with the appropriate settings.
![]()
Check the necessary steps to create an RFID program in To Create an RFID Program.
To Create an RFID Profile
Step-by-step
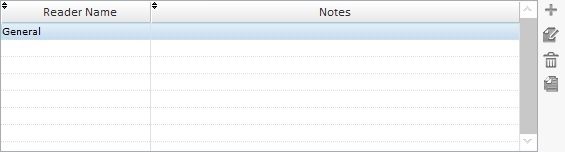
1. Use one of the following to open the table with the existing RFID profiles:
a. Open the "RFID" tab of the current project's properties window ("Project" menu ,in the Menu Bar > "Properties" option > "NFC/RFID" tab).
b. Click ![]() (available in the properties windows of some RFID related processes).
(available in the properties windows of some RFID related processes).
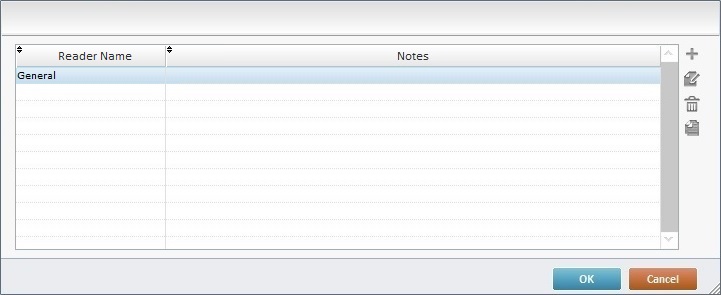
2. Double-click the table to open the "RFID Profile" window OR click ![]() (located to the right of the corresponding table).
(located to the right of the corresponding table).
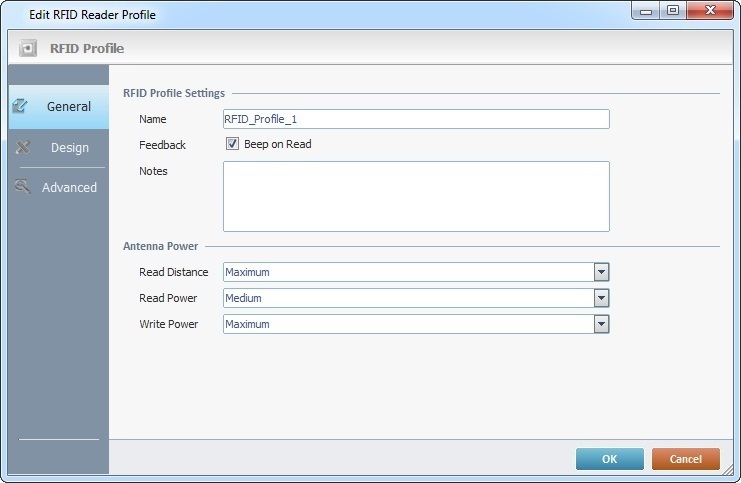
3. In the "General" tab (which is open by default), enter the RFID profile's name in the "Name" box.
4. If you require a confirmation beep (Feedback) after the tag detection, check the "Beep on Read" option.
5. If relevant, add notes to the RFID Profile in the "Notes" box.
6. Define the following RFID antenna's features:
Antenna Power |
|
Read Distance |
Select the appropriate reading range for the RFID reader from the drop-down ("Short (<30 cm)"; "Medium (<1 m)" or "Maximum"). |
Read Power |
Select the appropriate reading power for the RFID reader from the drop-down:
•Low - 25% of the antenna's transmission power. •Medium - 50% of the antenna's transmission power. •Maximum - 100% of the antenna's transmission power. |
Write Power |
Select the appropriate writing power for the RFID reader from the drop-down:
•Low - 25% of the antenna's transmission power. •Medium - 50% of the antenna's transmission power. •Maximum - 100% of the antenna's transmission power. |
7. You can create an RFID project based on the "User" memory bank. If you want to customize it, open the "Design" tab.
If not, continue to step 10.
![]()
The use/customization of the RFID tag's "User" memory bank must take into account the RFID tag being used (the type of tag and its features).
![]()
You can achieve a higher "reading speed efficiency" by creating/designing specific fields in that memory bank. This customized design enables the application to read only those specified fields instead of the full memory bank.

8. In the “Memory Bank size to read” section, use the corresponding drop-down to define the size for each memory bank to be read/written.
9. If required, you can customize the “User’s” memory bank design:
Name |
Define the field(s) to be included/read in the "User" memory bank. Enter the name of the data field. |
Size (Byte) |
Determine the length of each data field. Enter the value or use the arrows.
|
Encoding |
Select the correct data field encoding ("None (Hexa)", "Numeric (BCD-4bits)" or "Text (BCD-4bits)" from the drop-down. |
![]()
When customizing the “User” memory bank design, consider the size you defined in the previous section – that is the size limit you can work with.
![]()
The use/customization of the RFID tag's "User" memory bank must take into account the RFID tag being used (the type of tag and its features).
![]()
You can achieve a higher "reading speed efficiency" by creating/designing specific fields in that memory bank. This customized design enables the application to read only those specified fields instead of the full memory bank.
Use the editing icons to the right of the table to move the rows up and down and to delete or add more rows.
The "Memory Usage (32 bytes/line)" area displays a preview of the defined memory field sizes. See Possible Error Messages Regarding USR Size and Memory Usage.

10.Open the "Advanced" tab.

11. If required, define a password that, depending on the workflow context, will be used to provide access to tag information (ex: when associated to a "Lock/Unlock" process) or be used to permanently deactivate a specific RFID tag (when associated to the "Kill" process).
The password must consist of 8 hexadecimal characters.
12. As an option, you can create up to 2 pattern filters (A and B) for the "Inventory" procedure (when the operator uses an RFID reader to detect and communicate with RFID tags).
Filter "RFID Tags" on Pattern (Optional for Action "RFID") |
|
Pattern A |
Mode: None - Default option. Maintaining this option means that the options below are not active. Include - Check this option to create a filter pattern to include tags during reads based on the options below ("Memory Bank"; "Bit Position" and " Bit Pattern"). Exclude - Check this option to create a filter pattern to exclude tags during reads based on the options below ("Memory Bank"; "Bit Position" and " Bit Pattern").
Memory Bank - Select the memory bank to be used in the Pattern A filter (User, Reserved, EPC, TID).
Bit Position - Select the initial bit position to be used in the Pattern A filter.
Bit Pattern - Enter the required value to be used in the Pattern A filter ("0", "1" or "?"). |
Pattern B |
Mode: None - Default option. Maintaining this option means that the options below are not active. Include - Check this option to create a filter pattern to include tags during reads based on the options below ("Memory Bank"; "Bit Position" and " Bit Pattern"). Exclude - Check this option to create a filter pattern to exclude tags during reads based on the options below ("Memory Bank"; "Bit Position" and " Bit Pattern").
Memory Bank - Select the memory bank to be used in the Pattern B filter (User, Reserved, EPC, TID).
Bit Position - Select the initial bit position to be used in the Pattern B filter.
Bit Pattern - Enter the required value to be used in the Pattern B filter ("0", "1" or "?"). |
![]()
EPC Memory Bank - This memory bank is present in all RFID tag types. It includes default fields - "static fields" -(ex: "Stored PC", "Stored CRC") with data from the manufacturer.
TID memory Bank - This memory bank is present in all RFID tag types. It is NOT editable and stores the manufacturer's unique tag serial number.
User Memory Bank - This memory bank is editable. You can create fields to organize/manage the data from the RFID tag reads.
Reserved Memory Bank - This memory bank is only used to store the Access Password and the Kill Password.
13. Click ![]() to conclude or
to conclude or ![]() to abort the operation.
to abort the operation.
To Edit an RFID Profile
Step-by-step
1. Use one of the following to open the table with the existing RFID profiles:
a. Open the "RFID" tab of the current project's properties window ("Project" menu ,in the Menu Bar > "Properties" option > "NFC/RFID" tab).
b. Click ![]() (available in the properties window of some processes related to RFID).
(available in the properties window of some processes related to RFID).
2. Double-click the RFID profile you want to edit OR select it and click ![]() (located to the right of the corresponding table).
(located to the right of the corresponding table).
3. Edit the available tabs ("General", "Design" and/or "Advanced") as required. See To Create an RFID Profile.
4. Click ![]() to apply your modifications and conclude the editing.
to apply your modifications and conclude the editing.
Possible Error Messages Regarding USR Size and Memory Usage
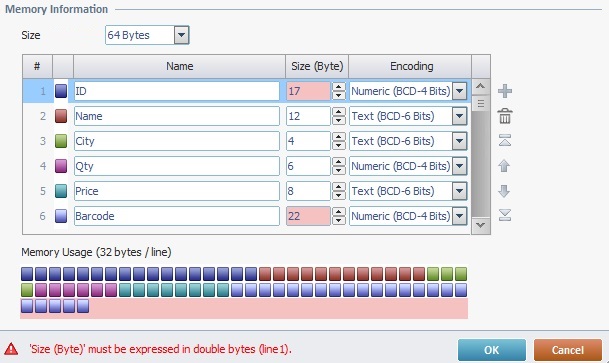
Error: "'Size (Byte)' must be expressed in double bytes (line1)"
Cause: The value defined in line 1 of the "Size (Byte)" column is an odd number and it must be an even number.
Action: Change that value into an even number.
Note: Line 6 also has a problem because its "Size (Byte)'"column is red:
 .
.
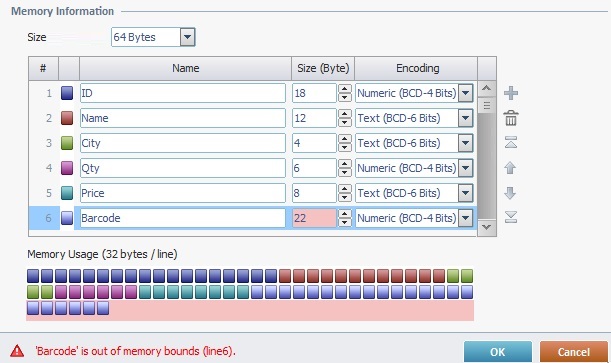
Error: " 'Barcode' is out of memory bounds (line6)"
Cause: The value defined in line 6 of the "Size (Byte)" column exceeds the defined value in the "Size of USR MB" (64 Bytes), meaning, the sum of all previously defined fields is 48 Bytes (below 64 Bytes) but adding 22 from line 6 totals 70 Bytes.
Action: Either change the value from line 6 so as not to exceed the predefined 64 bytes OR raise the "Size of USR MB" value.