|
How to Work with Processes |
  
|
How to Work with Processes
|
How to Work with Processes |
|
Overview
A process is a term used in MCL-Designer V4 which represents the commands that are used to execute a particular function or to manipulate the data within a program - to allow the development of the application business logic.
Processes can be associated to actions (events performed by the operator) which exist within controls and screens. In other words, they are a consequence of an action (ex: When an operator clicks on a button (event), it triggers an action, such as going to another screen (a "Go To" Branch Process). Processes can, also, be assigned to local procedures, routines, global events, "routines in" or "routines out".
All processes are executed sequentially.
They are divided into 16 groups, according to their purpose.
It is possible to group the most frequently used processes in the "Favorites" process group ![]() . See Navigating the Process Tab.
. See Navigating the Process Tab.
There are some recurring icons within each Process Group. They will be described in each main Process Group chapter.
The ![]() icon appears on the upper right corner of every process properties window and is used to attach notes to a process. Click
icon appears on the upper right corner of every process properties window and is used to attach notes to a process. Click ![]() and enter your notes in the resulting text box. These notes will be displayed in the "Actions" tab or the "Process" window, in the "Notes" field, and in the "Developer Report".
and enter your notes in the resulting text box. These notes will be displayed in the "Actions" tab or the "Process" window, in the "Notes" field, and in the "Developer Report".
A time out is a preset time period during which a task must be completed or that task is canceled. Time outs are particularly useful in a communications context - if the communication between system/application and Host does not occur within a specific period of time, the time out stops the constant connection request loop.
When defining a time out for your application, consider the following time outs:
•The TCP Time Out - a time out embedded in the target device's OS. It is defined/controlled by the manufacturer and can vary according to the device's OS (external context).
If the TCP Time Out is shorter than the Process or Host Profile Time Outs, it will be applied first and dismiss any other defined time out(s).
•The Process Time Out - the time out you define in a process (MCL-Designer context). It overrides the Host Profile Time Out.
•The Host Profile Time Out - the time out you define within the Host Profile(s) you use in Host related processes (MCL-Designer context).
![]()
A time out fulfillment always triggers a "Comm Error". You must take into account the TCP Time Out when you define a Process Time Out or a Host Profile Time Out at the risk of triggering a "virtual communications error":
Ex: Considering the TCP Time Out of a WinCE device of 21 seconds and a Process Time Out of 60 seconds, a "communications error" will be displayed after 21 seconds.
Ex: Considering the same TCP Time Out of a WinCE device (21 seconds) and a Process Time Out of 0 (infinite), the "communications error" will also be displayed after 21 seconds.
Ex: Considering the same TCP Time Out of a WinCE device of 21 seconds and a Process Time Out of 10 seconds, the "communications error" will also be displayed after 10 seconds.
![]()
Contact the manufacturer to find out/change the device's TCP Time Out.
![]()
The Host Profile Time Out does NOT apply to Aux related processes that use an Aux profile of the "Socket TCP" type.
![]()
Due to limitations of the connection provided by Windows Mobile Device Center (USB connection with the device), the used time out is always the TCP Time Out.
![]() When establishing a shorter Process Time Out than a TCP Time Out to override that TCP Time Out, always consider the task it is associated to.
When establishing a shorter Process Time Out than a TCP Time Out to override that TCP Time Out, always consider the task it is associated to.
Ex: If you define a 2 second time out within a "Receive from Host" process (used to receive data packets from a specific host server), the time out may not be enough to allow the application to contact the host, validate the communication and proceed to data packet exchange. The time out will interrupt the application's workflow and trigger a "virtual" error, meaning, there is no real issue regarding communication between the application and the host but a "Comm Error" will be displayed.
![]()
You can associate a Message Box to a time out to inform the operator that this condition occurred for a specific operation and, depending on the application's workflow, you can add the necessary processes/settings to allow the operator to retry that operation.
![]() If the time out is associated to Print/Aux related processes, the "Time Out" window is slightly different. See To Define a Time Out for a Print/Aux Process.
If the time out is associated to Print/Aux related processes, the "Time Out" window is slightly different. See To Define a Time Out for a Print/Aux Process.
To Define a Process Time Out
Step-by-step
1. Click ![]() (when available). This icon is located on the upper right corner of a properties window. This opens a "Time Out" window.
(when available). This icon is located on the upper right corner of a properties window. This opens a "Time Out" window.
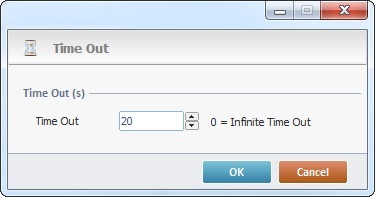
2. Define the time out value:
Time Out (s) |
|
Time Out |
Use one of the following to define the time out value: •Enter the number of seconds or use the up/down arrows. •Use the up/down arrows and select "<Default>" to use the time out associated to the selected host profile. ("<Default>" is NOT APPLICABLE to Aux profiles that use "Socket TCP".) •Use the up/down arrows to select "Infinite" or enter "0" for an infinite time out. |
3. Click ![]() to conclude or
to conclude or ![]() to abort the operation.
to abort the operation.
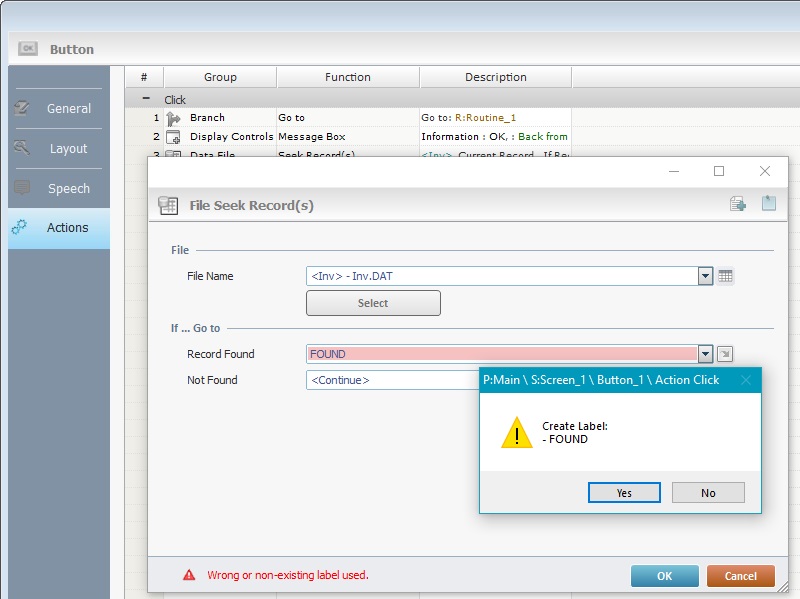
To Automatically Create a Label (Auto-Label Mechanism)
When developing an application, it can be very useful to mark specific points (= a label) in the execution code so the flow can to jump them.
You can create these labels using the "Set Label" process (see Working with Set Label Process) or via the Auto-Label mechanism. This feature allows you to, automatically, create a label within a properties window of a process without having to stop the development flow.
For instance, if you add a "File Seek Record(s)" process to the application flow, you can define a non-existing label in its properties window, specifically, in the fields that set the application flow's next destination (ex: in the "If...Go to" or "If Error..." related fields). Once you define the non-existing label and confirm it, the system will, automatically, create a label with the name you defined.
Step-by-step
1. In the properties window of the intended process, go to the field that should refer the label you want to create. Ex: In the "File Seek Record (s)" process, focus on the "Record Found" field).

2. Define a name for the required new label (ex: "FOUND").

3. Click ![]() . The system detects that the referred label does not exist/has the wrong name and displays a warning message.
. The system detects that the referred label does not exist/has the wrong name and displays a warning message.

4. Click ![]() again. As a result, there is a pop-up window requesting confirmation to create the non-existing label.
again. As a result, there is a pop-up window requesting confirmation to create the non-existing label.
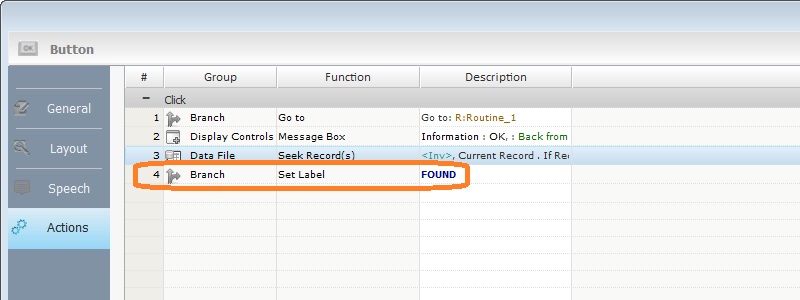
5. Click ![]() to confirm. The result is the creation of a new label in the same "Actions" tab (or "Routine" tab, "Procedure" tab or "Event" tab, depending on the context) that includes the process - it is represented by the "Set Label" process and is placed after the process it was created in.
to confirm. The result is the creation of a new label in the same "Actions" tab (or "Routine" tab, "Procedure" tab or "Event" tab, depending on the context) that includes the process - it is represented by the "Set Label" process and is placed after the process it was created in.
Topics
This chapter covers the following topics:
Topic |
|---|