|
Working with Set Label Process |
  
|
Working with Set Label Process
|
Working with Set Label Process |
|
Process Purpose
The "Set Label" process is used to create a name tag in a specific process line. It marks a precise point in the code for other processes in the Branch processes group to call for it.
When you add a process, you are required to define its settings. This occurs in the process's properties window which is displayed automatically after having added the "Set Label" process.
If any subsequent edition is required, double-click the process to open its properties window and enter the necessary modifications.

Proceed as follows:
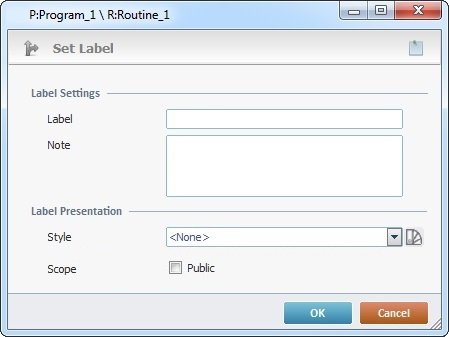
Label Settings |
|
Label |
Attribute a name to the label.
Each added label should have a unique name regardless of it being a public or private label.
|
Note |
If relevant, add notes to the label. |
Label Presentation |
|
Style |
If required, use comment rows to surround the label. Select an available style ("Warning"; "Long-Dashes"; "Small_Dashes"; "Stars" or "Dots") from the drop-down list OR click |
![]()
Process Indentation
When using the "Set Label" process, there is an automatic indentation in place for the processes that are added to the resulting label - the processes are positioned one step to the right of the label's own position.
In addition, you can do a manual indentation of a process:
a. Select the process you want to move.
b. Use the right-click menu "Indent +" and/or "Indent -" options OR the ![]() and/or
and/or ![]() buttons of the editing bar.
buttons of the editing bar.
Ex: The image shows the result of the auto-indentation in 2 labels (TEST_1" and "TEST_2") which have different positions and it refers the location of the buttons/options you can use to do a manual indentation.

If required, use the ![]() icon (upper right corner of the properties window) to attach any relevant notes to this process.
icon (upper right corner of the properties window) to attach any relevant notes to this process.
Click it and enter your notes in the resulting text box. These notes will be displayed in the corresponding "Actions" tab or "Process" window (in the "Notes" field) and in the "Developer Report".
After filling in the required options, click ![]() to conclude or
to conclude or ![]() to abort the operation.
to abort the operation.
The added process is displayed in the corresponding "Actions" tab or "Process" window.
Private or Public Labels
The label that was defined by this "Set Label" process can be used as a target destination and can be considered “private” or “public” depending on the context:
•If a label is set in a local procedure, it can only be called from within that local procedure (private label).
•If the setting of a label occurs within a screen or a control's action, it can only be called from within that action (private label).
•If a "Set Label" process is added to a routine, a "routine in" or a "routine out", you can set that label as "public" (it can be called from within that or other routines, as well as from actions) or as "private" (only called from within the routine or "routine in"/"routine out" that includes the label).
•When adding a label into a routine, a "routine in" or a "routine out", the corresponding properties window, includes another option:
•By default, any added labels are private. If you want to set a label's scope as "public", check the "Public" option.
•When renaming a "public" label, there is a window that proposes the renaming of the currently edited label in all its occurrences throughout the project.
Example:
The public label "LABEL_A", which is referred 4 times in the project, has been renamed "LABEL_B".
When you click ![]() to apply the change, you get the following message window:
to apply the change, you get the following message window:
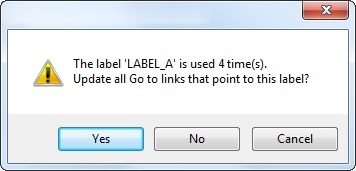
•Click ![]() to rename the label in all its uses throughout the project. "LABEL_A" is replaced with "LABEL_B" in every occurrence within the project.
to rename the label in all its uses throughout the project. "LABEL_A" is replaced with "LABEL_B" in every occurrence within the project.
•Choose ![]() to ONLY rename this label occurrence. "LABEL_A" is ONLY replaced with "LABEL_B" in the currently selected "Set Label" process. Everywhere else the label is mentioned, it is still called "LABEL_A".
to ONLY rename this label occurrence. "LABEL_A" is ONLY replaced with "LABEL_B" in the currently selected "Set Label" process. Everywhere else the label is mentioned, it is still called "LABEL_A".
•Select ![]() if you do NOT want to apply the label renaming, after all.
if you do NOT want to apply the label renaming, after all.
![]()
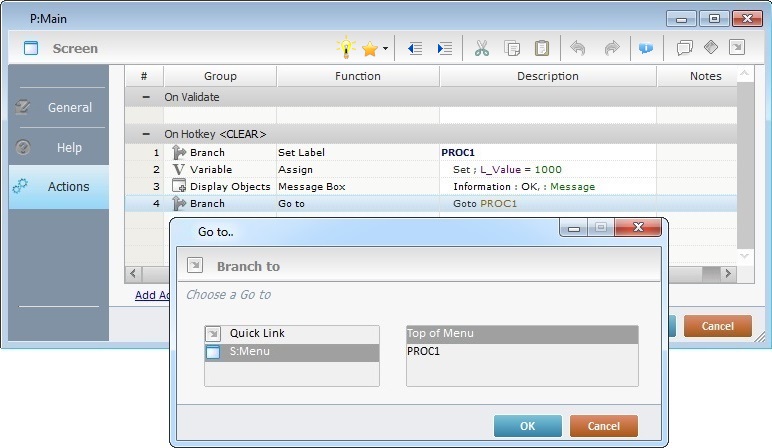
Remember to click the screen or routine (in the "Quick Link" column) that includes the label. It is the only way to have it available for selection.
![]()
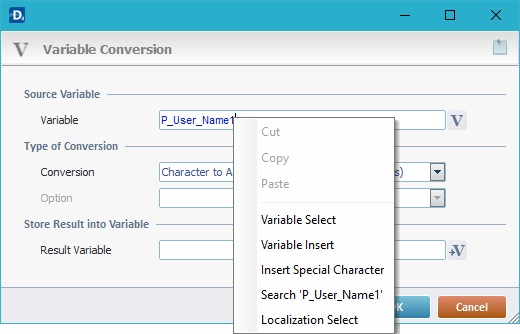
Use the right-click in MCL-Designer's input boxes to access some related options as well as the general "Cut", "Copy"; "Paste"; "Search" actions (active/inactive according to the current context).
Ex: If you right-click the "Variable" input box (included in a "Conversion's" properties window), you are provided with general editing/search actions and other more specific options such as "Variable Select" (see "Variable Select"); "Variable Insert" (see "Variable Insert"); "Insert Special Character" (see To Insert Special Characters into a Control's Text Input Field) and "Localization Select" (see Localization List).
If you right-click another input box, it may provide other possibilities.