|
Localization |
  
|
Localization
|
Localization |
|
Overview
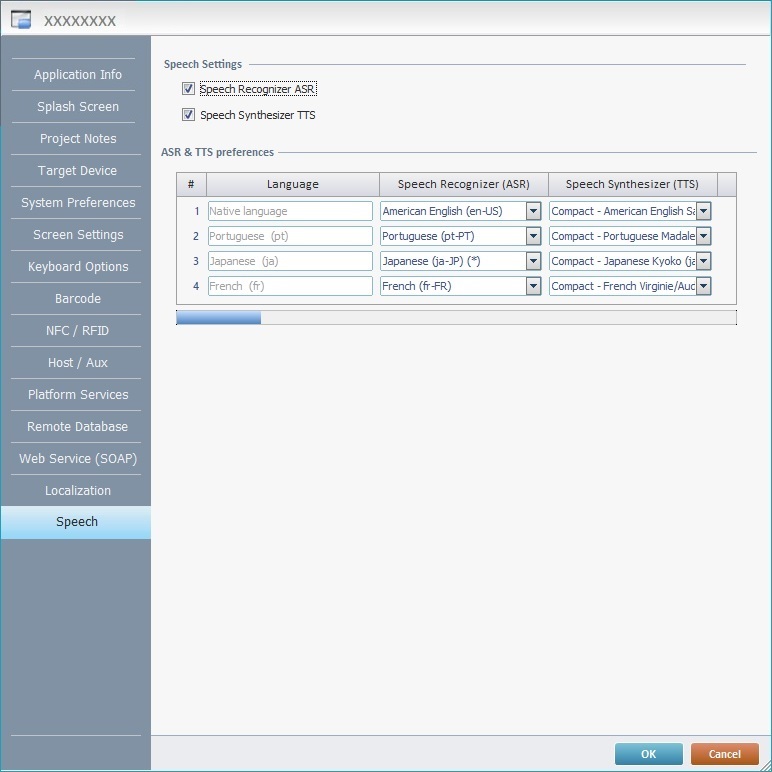
The "Localization" tab is used to define more project languages. In other words, if required, the project's native language (the one used by the programmer in the original project) can be translated into other languages.
Within MCL-Designer V4, “Localization” refers to the text that is added within the application to be viewed by the operator and available for translation – for instance, the word “Exit” in a Button control.
The text being entered by the programmer, during project development, is considered the project’s “native” language. The system suggests english as “native” language (for instance, any default localization tags are presented in english), however, the programmer can add text in the language that suits him best. The “native” language should mostly be used for development. This means the programmer should specify another language or languages to be a “project language".
Ex: Consider an application being developed that is supposed to be used in 3 languages – English, French and German. This implies having to define those 3 languages as project languages – although the “native” language is, by default english, it is recommended you select english as another project language to ensure an independent language file is created and becomes an application resource.
The defining of project languages is performed in the "Localization" tab.
Check the Basic Localization Usage Rules at the end of the topic.
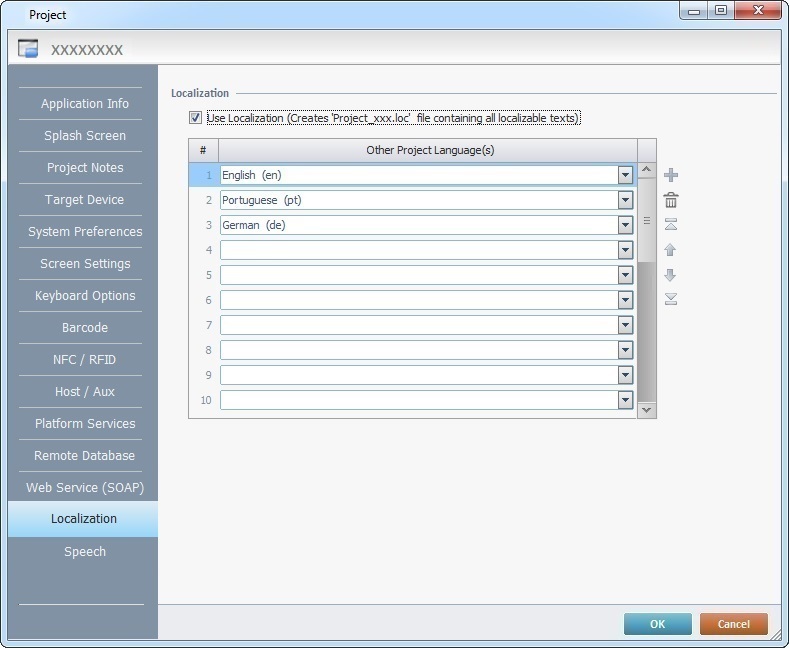
To define the use of other languages in the project, check the “Use Localization ...” option and, then, click the drop-down(s) to select the required language(s).
![]() If you want to use the localization tool in your project, do NOT uncheck the "Use Localization..." option during project development. Unchecking this option means you will no longer have access to the localization list.
If you want to use the localization tool in your project, do NOT uncheck the "Use Localization..." option during project development. Unchecking this option means you will no longer have access to the localization list.
Use the editing icons to the right of the table to move the rows up and down and to delete or add more rows. A project can have up to 40 alternative languages.
The entered options can only be edited during project development (published projects cannot have their settings edited).
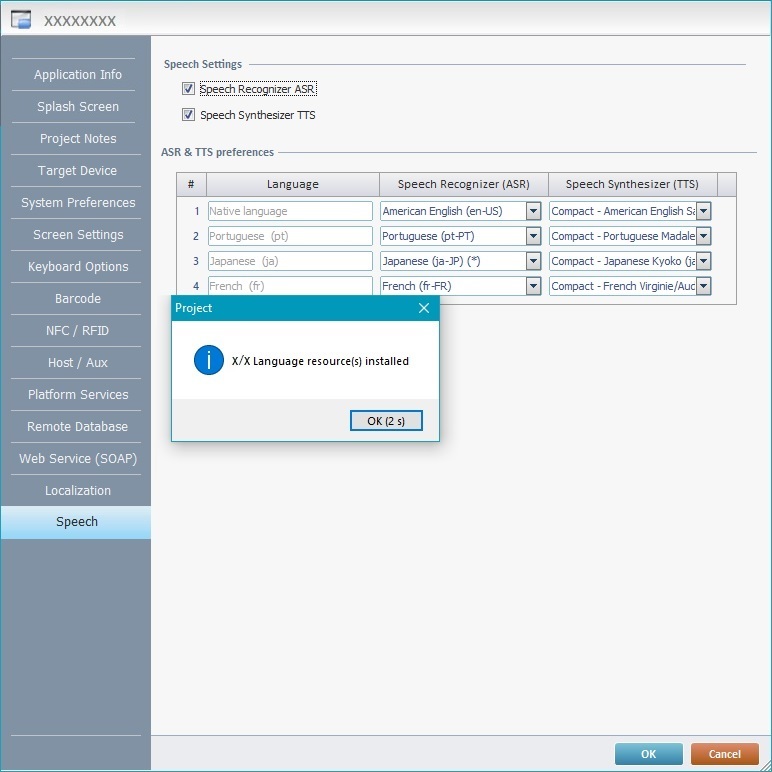
The added project languages are installed once you click ![]() to close the window, as indicated by the message below the table.
to close the window, as indicated by the message below the table.
Check the following example:
A new project language is added so a message warns you that the language package for the newly selected language(s) will be installed after the window is closed with the |
|
Once you click |
|
A pop-up with a success message indicates that the installation is complete. Click |
|
|
|
|
|
![]() The "Localization" tab affects all screens/controls within the project that contain text. Inserting/selecting languages will not, by itself, create translated localization tags of the text in the project. The programmer must provide the alternative localization tags/translations to the “native” language tags. He can either select a control/screen and provide a direct translation to the localization tag within that control/screen or resort to importing language files.
The "Localization" tab affects all screens/controls within the project that contain text. Inserting/selecting languages will not, by itself, create translated localization tags of the text in the project. The programmer must provide the alternative localization tags/translations to the “native” language tags. He can either select a control/screen and provide a direct translation to the localization tag within that control/screen or resort to importing language files.
Localization within Screens, Controls and Processes
The text contained in a screen, control and/or process is referred to as a tag.
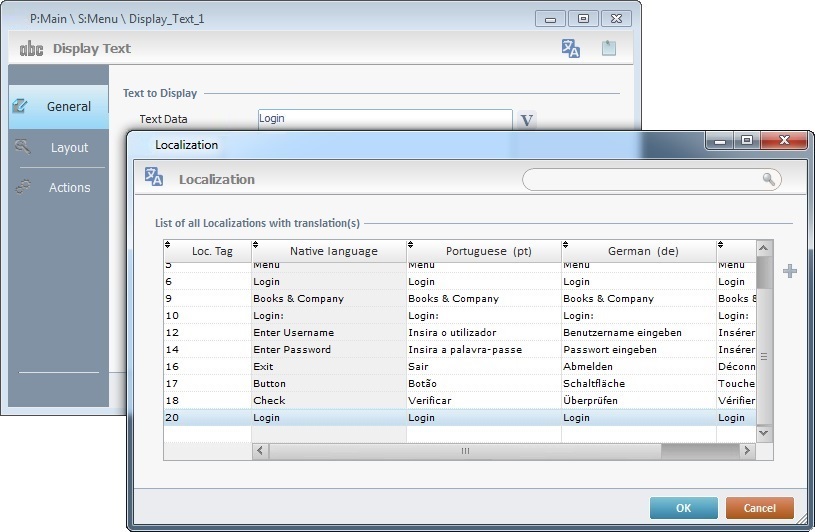
To provide an alternative tag to the native language at control/screen level, use the ![]() icon.
icon.
Open the properties window of either control or screen you want to have translated (by double clicking it) and, then, click ![]() . This opens a "Localization" window where it is possible to enter the translation of the native tag associated to the selected control/screen.
. This opens a "Localization" window where it is possible to enter the translation of the native tag associated to the selected control/screen.

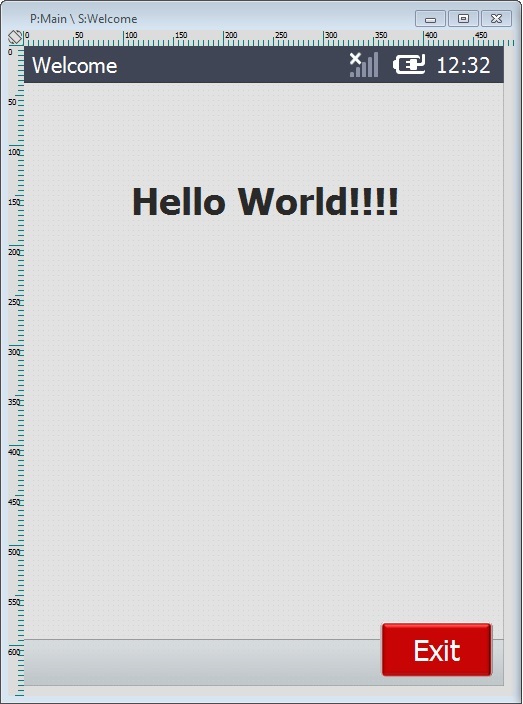
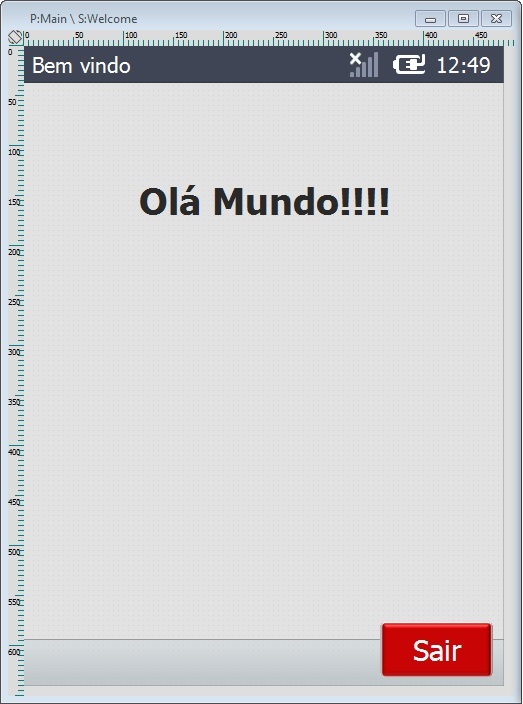
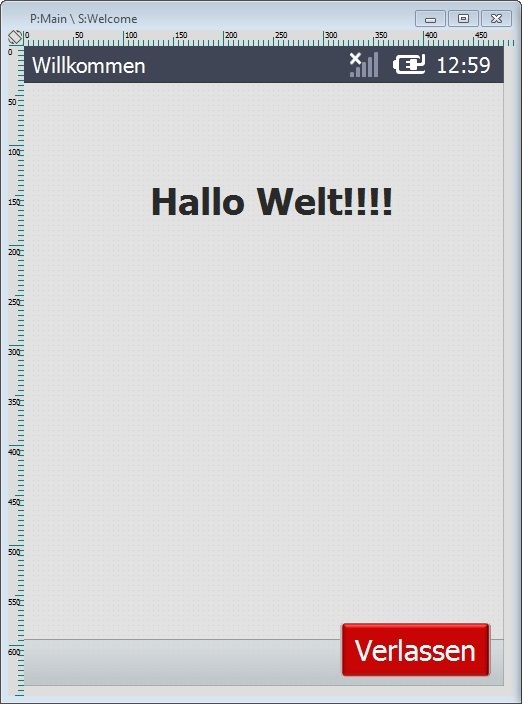
Ex: The “Display Text’s” localization tag is “Hello, world!” (in the native language). Since the project languages (defined in the “Localization” tab) are English, Portuguese and German, the translation for “Hello World!” was entered, by the programmer, in the corresponding columns. MCL-Designer V4 does NOT provide an automatic translation from the “native” language into the other project languages.
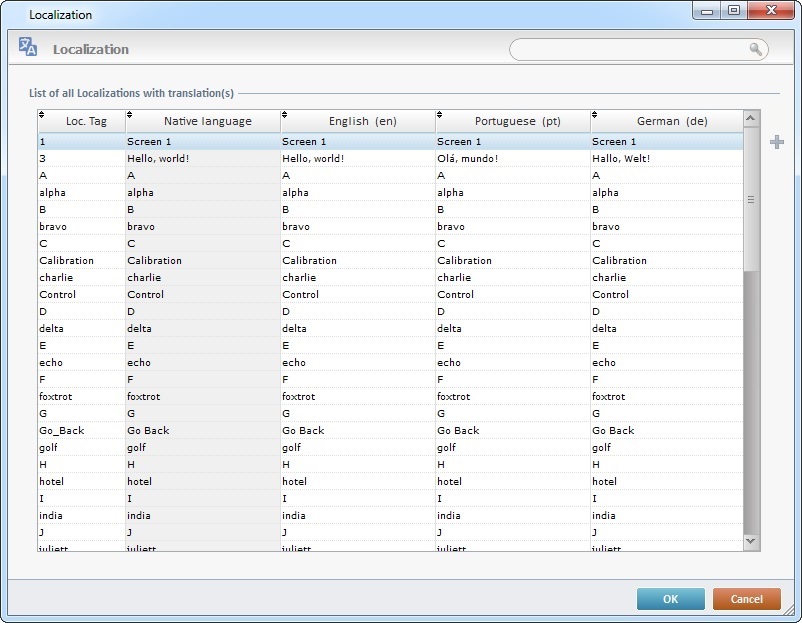
All the localization tags of a project are grouped into a list that includes the “native language” localization tags and the translation of those tags into the other previously selected project language(s).
The window with the listed localization tags allows you to view, replace and/or edit them as well as add more localization tags
•To add a tag:
a. Select an empty row and click again or use ![]() (to the right of the list) to set an empty row to edit mode.
(to the right of the list) to set an empty row to edit mode.
b. Enter a number in the "Loc. Tag" column.
c. Enter the intended text in each language column.
d. Click outside the row to set it to view mode.
The "Loc. Tag" and "Native Language" columns are mandatory, you cannot successfully add a tag if they are not filled in.
•To edit an existing tag:
a. Select the tag row you want to edit.
b. Click the tag field to set it to edit mode.
c. Edit the tag.
d. Click outside the row to set it back to view mode.
•The deleting of tags is limited. The ![]() button only becomes available if you select a tag that you have added to the window's localization list.
button only becomes available if you select a tag that you have added to the window's localization list.
a. Select the tag you want to delete (an added tag).
b. Click ![]() .
.
•If required, you can search for a specific tag by using the search box.
a. You can enter the full or partial text of a localization tag or its “Loc. Tag” value in ![]() . The results are automatically displayed below.
. The results are automatically displayed below.
b. To resume an unfiltered view, delete the information from the search box.
There are 2 ways to access the Localization List:
1. Use the right-click in MCL-Designer's input controls to access the "Localization Select" option.
This option is only available if the right-clicked input control refers to or contains a localization tag.
•The tag included in the input control you right-clicked (ex: a Display Text), is already selected. If you select a different tag and click ![]() , the newly selected tag will replace the previous tag in the current input control.
, the newly selected tag will replace the previous tag in the current input control.
|
|
|
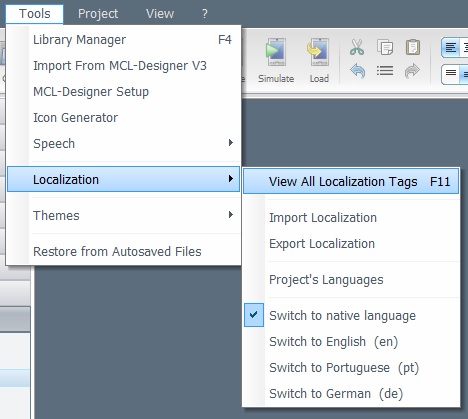
2. Open the “Tools” menu (located in the Menu Bar), mouse over the “Localization” option and select “View All Localization Tags".
|
|
|
Localization's Language Files
Once a project language is defined, the corresponding language file is generated. By default, it will be filled in with a duplicate of the localization tags created in the “native” language. It is up to the programmer to provide the necessary translations for each localization tag. Each selected language has its own language file. When a project is generated, the language file becomes a resource of the resulting application ("*.loc" file).
Some of the entities available in the Library for export may also include "*.loc" files (ex: a global procedure with language resources). If required, select the language resources (= "*.loc" files) when importing the element into a project. If you want an imported language resource to be a part of the target project, the language it represents must be one of the project languages. For instance, when generating a project, ONLY the language files that represent a project language will be included in the generated output. Ex: If you have imported a Global Procedure with 4 "*.loc" files representing English, German, French and Spanish but the target project only has English and Spanish defined as project languages, when generating the project, the output will only include English and Spanish "*.loc" files despite the import of the other language resources into the project.
Language files can be filled in throughout project development – added, one by one, to the “Localization List” - or you can import the necessary language file(s) according to the defined project language(s).
![]() A language file should always be exported prior to importing one for the application. This ensures that the file structure corresponds to the project structure. In other words, export the language file (which generates an Excel file) and complete the fields accordingly. Then, import that same file back into the project. You can, then, edit it (remove or add entries), if necessary.
A language file should always be exported prior to importing one for the application. This ensures that the file structure corresponds to the project structure. In other words, export the language file (which generates an Excel file) and complete the fields accordingly. Then, import that same file back into the project. You can, then, edit it (remove or add entries), if necessary.
There are 3 ways to feed a language file:
•Export the language file (Excel file), fill in the entries and import it back to the project.
•Click "View All Localization Tags" ("Tools" menu > "Localization" option > "View All Localization Tags" OR right-click the text of an input control and select “Localization Select”) and insert/edit the corresponding alternative tags.
•Select a control/screen, click ![]() and enter the necessary translation(s) for that control/screen's text.
and enter the necessary translation(s) for that control/screen's text.
1. Fill in the "Localization" tab with the required languages.
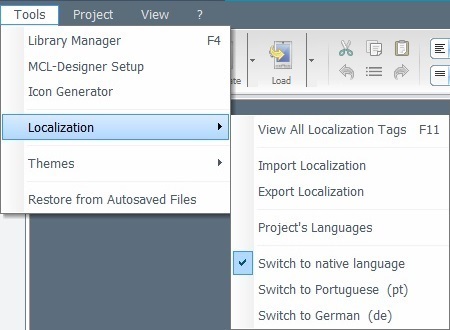
2. Go to the Menu Bar and click "Tools".
3. In the drop-down menu, mouse over the "Localization" option and, then, select "Export Localization".
4. The next window displays the language options that were specified in the "Localization" tab. Check the language(s) you want to export.
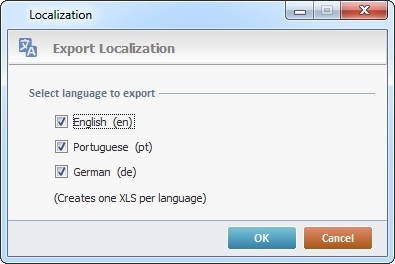
5. Click ![]() to create an Excel file for each checked language.
to create an Excel file for each checked language.
6. Once the export is complete, you are asked if you want to open the Excel file. Click ![]() if you want to view/work on it right away.
if you want to view/work on it right away.
![]()
The exported files are automatically placed in the project's folder ("Project Directory"), specifically, in the "Localization" sub-folder.
The Excel file, which contains the various fields that represent the project's structure, can, now, be completed with the respective language.
1. After ensuring that the Excel file is properly completed, go to the "Tools" menu, in the Menu Bar, and click it.
2. Mouse over the "Localization" option and, then, select "Import Localization".

3. In the open OS browse window, select the file to be imported into the project and click ![]() .
.
4. Click ![]() in the window that confirms a successful import to conclude the operation.
in the window that confirms a successful import to conclude the operation.
The entries of the newly imported file can be viewed and edited in the project's "Localization List".
To Switch Languages within the Project (Localization)
If there is more than one "project language", the programmer can switch the language in use within the project:
1. Open the "Tools" menu (in the Menu Bar).
2. Mouse over the "Localization" option.
3. Select the appropriate “Switch to…” option – the available options depend on the project languages defined in the “Localization” tab.
![]() If the project being developed is a speech project, the “Localization List” and, consequently, the language file(s) will also include all the entries of the current project’s “word lists” - the default MCL-Designer V4 word lists “NATO_Alphabet”, “Control Words” and “Global Words” are automatically added to the “Localization List” and to each language file. Those entries are, by default, in english so, if a translation is required, it is up to the programmer to provide the correct tag alternative.
If the project being developed is a speech project, the “Localization List” and, consequently, the language file(s) will also include all the entries of the current project’s “word lists” - the default MCL-Designer V4 word lists “NATO_Alphabet”, “Control Words” and “Global Words” are automatically added to the “Localization List” and to each language file. Those entries are, by default, in english so, if a translation is required, it is up to the programmer to provide the correct tag alternative.
![]()
This sort of language rotation (via the “Tools” menu) ONLY applies to the development environment (working environment and MCL-Simulator). If the programmer wants language switches to be executed in the application itself, he must use the "Set App. Language" process ("Other" group of processes). See Working with Set App Language Process.
Consider the following: •The project's native language is english. •The defined project's languages are Portuguese and German. •The necessary Portuguese and German localization tags have been filled in by the developer.
|
To Associate a Regional Setting to a Project Language
As mentioned in the beginning of the chapter, a project can include more than one language (ex: a project developed in French can be adapted/translated into German and italian).
In addition, you can associate a specific date/time format to each project language. This is defined in the "Project Properties" window:
1. Open the “Localization” tab ("Project" menu > "Properties" option > "Localization" tab).
2. Click ![]() (on the window’s upper right corner).
(on the window’s upper right corner).
3. In the resulting window, select a format for each parameter from the available options:
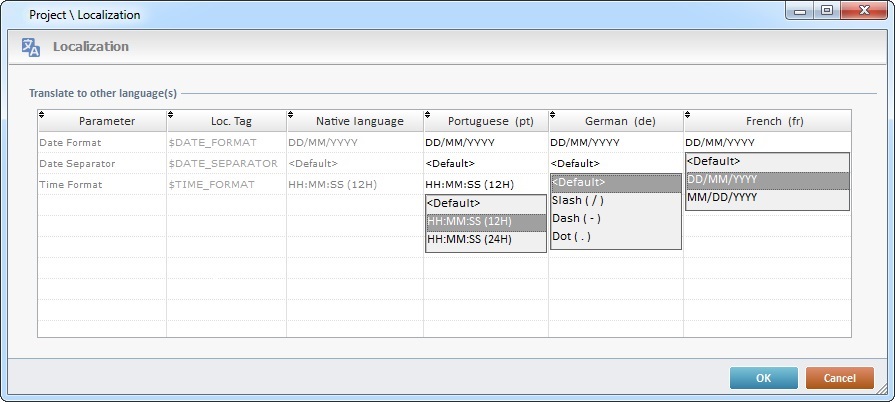
![]() If the <Default> option is maintained, the project languages will assume the regional options defined in the "System Preferences" tab.
If the <Default> option is maintained, the project languages will assume the regional options defined in the "System Preferences" tab.
To apply the new date/time format settings, click ![]() .
.
Localization as a Resource
MCL-Designer allows you to export/import the localization file(s) used within a project but it is also possible to simply export the localization tags associated to the element being exported.
Basic Localization Usage Rules
•Every text value entered during project development (ex: in controls, processes, word lists, etc.) is included in the project’s “Native Language”.
•By default, when project languages are added to the project (in the “Localization” tab), the suggested localization values for those languages are a copy of the corresponding “Native Language” localization values. It is the responsibility of the developer to provide the correctly translated localization values for the added project languages – we suggest the export of the corresponding language file and subsequent import after having it filled in with the required translated localization values.
•When there are several project languages, the edition of a “Native Language” localization value, in the “Localization List”, affects the corresponding localization values of the other project languages. However, if you do the same to the localization value of a specific project language, the other languages and the “Native Language” will not be affected, the corresponding localization values in the “Localization List” will not reflect the change.
•Localization tags can be shared (ex: the copy/paste of a “Button” control, with the text “Exit”, creates 2 controls but only one localization tag/one localization value in the “Localization List”). When the shared localization tag is edited in the “Localization List”, the edition affects every occurrence of that tag, throughout the project.
•If you edit the localization value outside the “Localization List”, for instance, in the “Text” field of a control, this will generate a new localization tag in the “Native Language” and it will not matter if it is shared – only the currently selected occurrence will be affected. If there are other project languages, the new localization tag will be replicated onto their list, in which case, a translated localization value will have to be provided.