Editing Processes
Overview
Once a process is added (to screens, controls, routines, local procedures, global events, a "routine in" and/or a "routine out"), it becomes editable. This can occur in the "Actions" tab, the "Routine" tab, the "Procedure" tab and/or the "Event" tab (the edition relates to the execution sequence of all the added processes) or inside the process itself (in the properties window of each process).
To Edit Processes
If the editing occurs at tab level (in the"Actions","Routine", "Procedure"and/or "Event" tab):
Use the Editing Bar (click the desired option directly) to perform several editing operations, such as "Cut"; "Paste", "Insert Comment", etc.
|
|||
|
Provides a list with the available processes to select from. See Detail of Process List. Expand the intended processes group, double-click the process you want to add and fill in its properties window. |
||
|
Provides a drop-down with the processes you defined in the Favorites group (in the "Process" tab). Select the one you want to add and fill in its properties window. |
||
|
Indents the selected "Description's"content to the left.
|
||
|
Indents the selected "Description's"content to the right.
|
||
|
Cuts/deletes the selected row with the possibility to paste it again with the use of the Paste icon. |
||
|
Copies the selected row.
When copy/pasting a process from one control type to another (ex: from an "Advanced List Box" to a "Button"), you must consider if that process uses default local variables - a default local variable of a control type is specifically meant for that control type. So, when you paste a process that uses a default local variable into another control type, that variable becomes inadequate. It must be replaced with another variable. During the "process paste" operation, you get the following warning message with the default local variables you MUST change:
|
||
|
Pastes the content of a previous Copy or Cut.
When copy/pasting a process from one control type to another (ex: from an "Advanced List Box" to a "Button"), you must consider if that process uses default local variables - a default local variable of a control type is specifically meant for that control type. So, when you paste a process that uses a default local variable into another control type, that variable becomes inadequate. It must be replaced with another variable. During the "process paste" operation, you get the following warning message with the default local variables you MUST change:
|
||
|
“Undo” option. |
||
|
“Redo” option. |
||
|
Disables/enables the selected row. |
||
|
Adds a row with a comment. If you define the comment as having separators, this row will automatically be inserted between 2 rows of the selected separators. When you click this button, you open the following window:
|
||
|
Inserts a label. See Working with Set Label Process. |
||
|
Inserts a “Go to” process. See Working with Go to Process. |
||
OR
Right-click a row and select the appropriate editing option in the resulting menu.
|
Add/Insert... |
Displays a Process List. Select the process to be added from that list. See Detail of Process List. |
Edit |
Opens the properties window of the selected process so you can edit it. |
|
Delete |
Deletes the selected row. |
|
Go To |
Only active when the selected row includes a Branch process with a specific destination. Opens the selected Branch process's target destination (ex: screen, routine, etc.). In the case of a label as the destination, it selects the execution row containing the defined label. |
|
Cut |
Removes the selected row. To undo this, use |
|
Copy |
Copies the selected row.
When copy/pasting a process from one control type to another (ex: from an "Advanced List Box" to a "Button"), you must consider if that process uses default local variables - a default local variable of a control type is specifically meant for that control type. So, when you paste a process that uses a default local variable into another control type, that variable becomes inadequate. It must be replaced with another variable. During the "process paste" operation, you get the following warning message with the default local variables you MUST change:
|
|
(Un)Comment Line(s) |
Disables/enables the selected row. |
|
Insert Separator |
Inserts a separator in the selected row. There are 3 types of separators to select from ("********", "--------" or "........"). |
|
Indent + |
Indents the selected "Description's"content to the right.
|
|
Indent - |
Indents the selected "Description's"content to the left.
|
![]() If you right-click an empty row within an "Actions", "Routine", "Event" or "Procedure" tab, the right-click menu will have fewer options.
If you right-click an empty row within an "Actions", "Routine", "Event" or "Procedure" tab, the right-click menu will have fewer options.
|
Add/Insert |
Displays a "Process List". Select the process to be added from that list. See Detail of Process List. |
Paste |
Only available if there was a previous Cut or Copy operation.
When copy/pasting a process from one control type to another (ex: from an "Advanced List Box" to a "Button"), you must consider if that process uses default local variables - a default local variable of a control type is specifically meant for that control type. So, when you paste a process that uses a default local variable into another control type, that variable becomes inadequate. It must be replaced with another variable. During the Process Paste operation, you get the following warning message with the default local variables you MUST change:
|
|
Insert Separator |
Inserts a separator in the selected row. There are 3 types of separators to select from ("********", "--------" or "........"). |
If the editing occurs within the process (in the properties window of each process):
Double-click the process to be edited. This opens a properties window, specific to each process.
This is the same window that appears upon adding a process to an "Actions" tab, a "Routine" tab, an "Event" tab and/or a "Procedure" tab.
To get detailed information on how to fill in these properties windows, refer to each process chapter.
Detail of the "Comment Style List" window

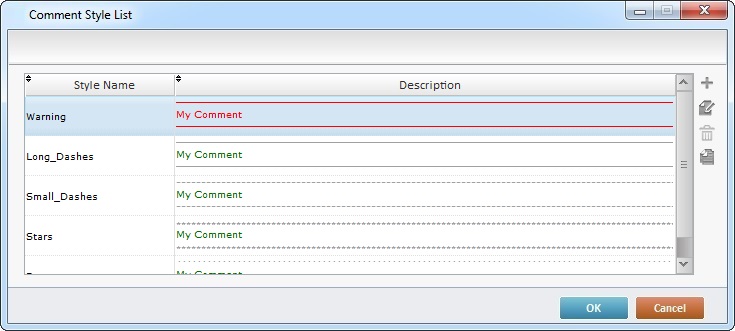
When you click ![]() (available in the "Comment" window and/or the "Set Label" process), it opens the "Comment Style List" window.
(available in the "Comment" window and/or the "Set Label" process), it opens the "Comment Style List" window.
This window offers a preview of the available comment styles (the default ones and the ones you create).
It also allows you to create new styles or edit the existing ones.
To Create a Comment Style
Step-by-step
1. Click ![]() in the "Comment Style List" window.
in the "Comment Style List" window.

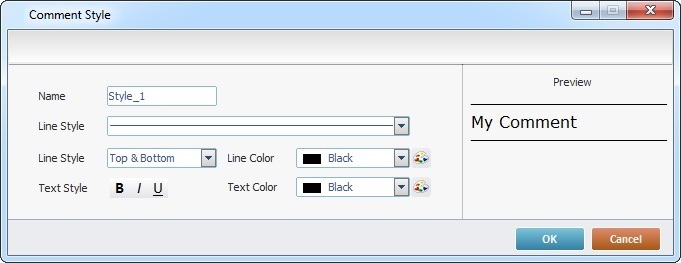
2. Enter a name for the new style in the "Name" field.
3. Select a line style from the corresponding drop-down (the type and positioning).
4. In "Line Color", select a color from the drop-down OR click ![]() and customize a color in the resulting window.
and customize a color in the resulting window.
5. In the "Text Style" option, select the appropriate font option(s) (Bold, Italic and/or Underline).
6. Select a text color from the corresponding drop-down OR click ![]() and customize a color in the resulting window.
and customize a color in the resulting window.
The preview box displays your editing choices.
7. Click ![]() to apply your changes.
to apply your changes.
The new style is, now, displayed in the "Comment Style List" window.
To Edit a Comment Style
Step-by-step
1. In the "Comment Style List" window, select the style you want to edit.
2. Click ![]() (located to the right of the table).
(located to the right of the table).

3. In the comment style's properties window, edit the required options.
Your editions are displayed in the preview box.
4. Click ![]() to apply your changes.
to apply your changes.
To Remove a Comment Style
Step-by-step
1. In the "Comment Style List" window, select the style you want to delete.
2. Click ![]() (located to the right of the table).
(located to the right of the table).

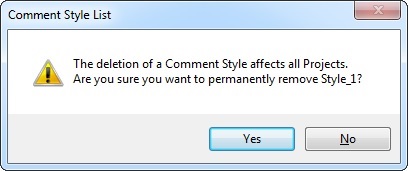
3. Confirm the operation by clicking ![]() in the resulting window.
in the resulting window.
![]()
You CANNOT remove a default comment style, you can only edit it. The ![]() button is inactive when you select a default comment style.
button is inactive when you select a default comment style.
![]() Make sure the comment style you want deleted is not in use in other projects before you remove it because it will affect those projects.
Make sure the comment style you want deleted is not in use in other projects before you remove it because it will affect those projects.
To Copy a Comment Style
Step-by-step
1. In the "Comment Style List" window, select the style you want to copy.
2. Click ![]() (located to the right of the table) which opens a comment style's properties window.
(located to the right of the table) which opens a comment style's properties window.
3. Maintain/edit the necessary fields of the comment style copy's properties window.
4. Click ![]() to apply your changes.
to apply your changes.
The comment style copy is also displayed in the "Comment Style List" window.