|
Custom Actions |
  
|
Custom Actions
|
Custom Actions |
|
Overview
In addition to the default actions provided by MCL-Designer, it is possible to define "custom actions" to retrieve specific information and share it among the elements of the MCL application and/or notify the MCL application about MCL-Client actions that are running/have been executed.
For instance, you can declare a "custom action" in a background procedure (running in a secondary thread) so it shares its data with programs running in the foreground.
Another example is using a "custom action" to notify the MCL application that an MCL-Client action has been executed.
"Custom actions" are created at project level and can be used by all the compatible MCL-Designer entities (ex: programs, background procedures).
This type of action has its own parameters, defined by the developer, so that when the "custom action" is triggered, the resulting data can be shared with the screen that has called for it.
A "custom action" does not, necessarily, require operator interaction to be triggered, it can be initiated by the business logic's execution flow.
This action is usually added to a screen allowing the program to receive the intended data/notification and process that information/display it, as required by the project.
Once a "custom action" is created, it becomes available in every screen's action list.
It is possible to create as many "custom actions" as necessary and edit, copy or delete them, at any time.
![]()
Be aware that the edition of a "custom action" that has been declared by an MCL-Designer entity (such as a program) can affect the project's business logic/execution flow.
Check the links below and follow the one that best suits the "custom action" related operation you want to perform:
To Define a "Custom Action" in a Project below;
To Add a "Custom Action" to a Screen;
To Add a "Custom Action" to a Control;
To Define a "Custom Action" in a Project
Step-by-Step
1. Use one of the following options to access the "Custom Action List" table:
a. Click ![]() in the "Actions" tab of a screen or a control and, in the resulting window, click
in the "Actions" tab of a screen or a control and, in the resulting window, click ![]() .
.
b. Open the "Trigger Action" process (this is a background procedures related process included in the Branch group of processes) and click the available ![]() option.
option.
2. Click ![]() (located to the right of the table) to open a properties window for the new "custom action".
(located to the right of the table) to open a properties window for the new "custom action".

3. In the "General" tab (open by default), fill in the following options:
Action |
|
Name |
Enter a name for the new "custom action" or maintain the suggestion. |
Enqueue Triggered Actions |
If the project's business logic implies execution loops/having several occurrences of the same action (ex: to have an action that notifies the foreground every time a specific group of labels has been printed), you can check this option to ensure that every occurrence of this "custom action" (ex: completing the printing of Label Series A, completing the printing of Label Series B, etc.) is queued/kept for retrieval by the entity that declares it. Leaving it unchecked means ONLY the latest "custom action" occurrence will be retrieved. The checking/unchecking of this option does not affect the "custom action", if it is only meant to have one occurrence. |
Notes |
Optionally, add notes to describe the "custom action". |
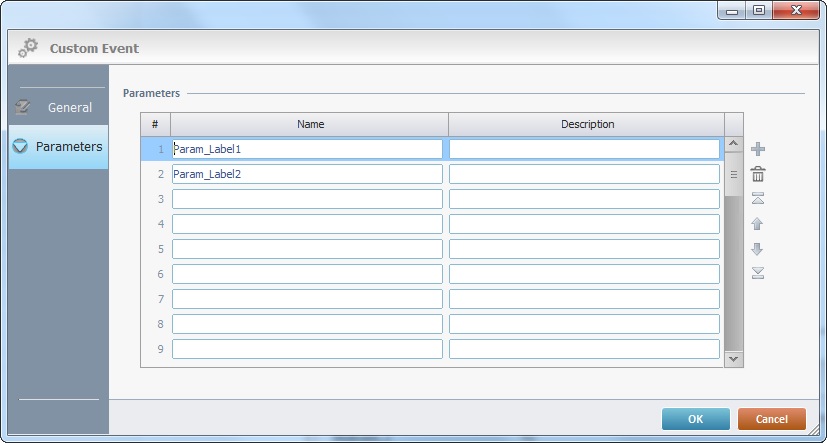
4. Open the "Parameters" tab.

5. Fill in the table:
Parameters |
|
Name column |
"Custom action" parameters provide specific data to be shared with the screen that evokes it when the "custom action" is triggered (ex: triggered by a background procedure or an MCL-Client action). The calling screen, automatically, generates predefined Local Variables with the same name as the "custom action" parameters to receive their data. For instance, a screen that calls a "custom action" with a "Timestamp" parameter will generate/include a default local variable named "L_Timestamp" which will be fed with the data provided by that "custom action’s" parameter
Define a name for the required "custom action" parameter(s). |
Description column |
Enter a description for the corresponding parameter. |
If, necessary, use the editing icons to the right of the table to add or edit, delete, copy the selected parameter.
6. Click ![]() .
.
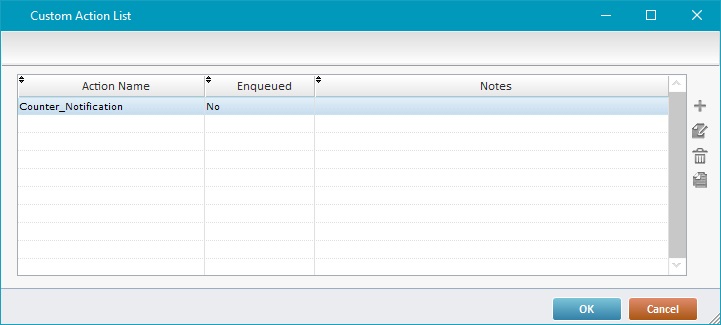
The new "custom action" is displayed in the "Custom Action List" table:
It is also added to the "Action" window of every screen or control (the window that is accessed when you click ![]() ).
).

![]()
An alternative to creating a "custom action" from scratch is to copy an existing "custom action". To do so, access the "Custom Action List", select the "custom action" you want to duplicate and click ![]() . This opens a properties window for the duplicate "custom action" which has the same name as the copied action plus an incremented number. Edit the duplicate as necessary.
. This opens a properties window for the duplicate "custom action" which has the same name as the copied action plus an incremented number. Edit the duplicate as necessary.
See To Edit a "Custom Action" below.
1. Use one of the following methods to access the "Custom Action List" table:
a. Click ![]() in the "Actions" tab of a screen or control and, in the resulting window, click
in the "Actions" tab of a screen or control and, in the resulting window, click ![]()
b. Open the "Trigger Action" process (this is a Background Procedures related process included in the Branch group of processes) and click the available ![]() option.
option.
2. Select the "custom action" you want to edit and click ![]() to open its properties window.
to open its properties window.
3. If necessary, you can edit the following:
a. In the "General" tab:
Action |
|
Name |
Maintain or edit the name of the action - the new name cannot be used by any other entity/element within the project. |
Enqueue Triggered Actions |
Check/uncheck the option. A checked option (for actions that occur cyclically) means that all the "custom action's" occurrences are kept/can be retrieved by the entity that declares it. An unchecked option means that, only the latest action occurrence is retrieved. Ex: In a "custom action" with periodical occurrences, the latest occurrence replaces the previous occurrence. The checking/unchecking of this option does not affect a "custom action" that is only meant to have one occurrence. |
Notes |
Maintain, edit or add notes, if relevant. |
b. In the "Parameters" tab:
Parameters |
|
Name column |
"Custom action" parameters provide specific data to be shared with the screen that evokes it when the "custom action" is triggered (ex: triggered by a background procedure or an MCL-Client action). The calling screen, automatically, generates predefined Local variables with the same name as the "custom action" parameters to receive their data.
Maintain or define a new name for the "custom action's" parameter(s). |
Description column |
Maintain/edit the description or add information about the corresponding parameter. |
4. Once you are done with your edition, click ![]() to apply your changes.
to apply your changes.
To Add a "Custom Action" to a Screen
Step-by-step
1. Go to the "Actions" tab of the intended screen's or control's properties window.

2. Click ![]() (at the bottom of the tab) and open the "Action" window.
(at the bottom of the tab) and open the "Action" window.

3. Scroll down the "On Action" list to access the "Custom" section.
4. Select the intended "custom action".
5. Click ![]() to apply.
to apply.
6. If required, add processes to the "Actions" tab, below the selected "custom action" to be triggered once it gets the data the intended data. See Adding and Editing Processes.
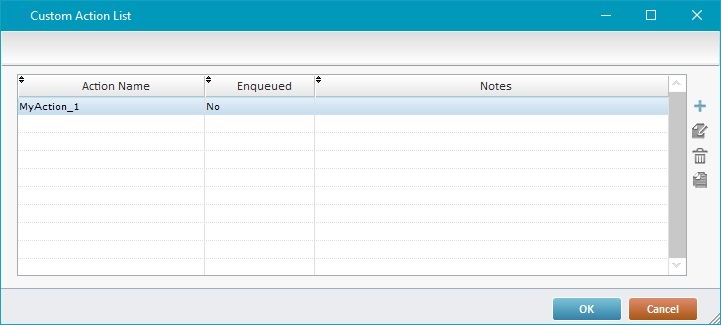
![]() The value of each parameter included in the "custom action" is, automatically, stored into a predefined Local variable with the same name as the source parameter. Ex: "MyAction_1" has a parameter called "New_Task" so, upon adding it to a screen, a Local variable named "L_New_Task" is, automatically, generated to store the incoming value from that parameter.
The value of each parameter included in the "custom action" is, automatically, stored into a predefined Local variable with the same name as the source parameter. Ex: "MyAction_1" has a parameter called "New_Task" so, upon adding it to a screen, a Local variable named "L_New_Task" is, automatically, generated to store the incoming value from that parameter.
To Add a "Custom Action" to a Control
"Custom Actions" are only associated to Input Controls (Input Keyboard; Input Barcode; Input Date; Input Time; Input Spin; Input List and Input Cash), the Signature Capture, File Browse, Advanced List Box and Grid controls.
Step-by-step
1. Go to the "Actions" tab of the intended controls's properties window (ex: an Input Keyboard control).
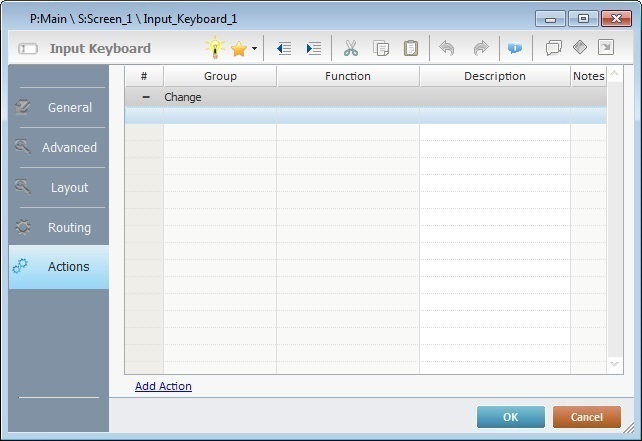
2. Click ![]() (at the bottom of the tab) and open the "Action" window.
(at the bottom of the tab) and open the "Action" window.

3. Scroll down the "On Action" list to access the "Custom" section.
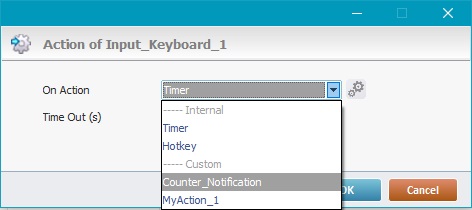
4. Select the intended "custom action".
5. Click ![]() to apply.
to apply.
6. If required, add processes to the "Actions" tab, below the selected "custom action" to be triggered once it gets the intended data. See Adding and Editing Processes.
![]() The value of each parameter included in the "custom action" is, automatically, stored into a predefined Local variable with the same name as the source parameter. Ex: "MyAction_1" has a parameter called "New_Task" so, upon adding it to a screen, a Local variable named "L_New_Task" is, automatically, generated to store the incoming value from that parameter.
The value of each parameter included in the "custom action" is, automatically, stored into a predefined Local variable with the same name as the source parameter. Ex: "MyAction_1" has a parameter called "New_Task" so, upon adding it to a screen, a Local variable named "L_New_Task" is, automatically, generated to store the incoming value from that parameter.
Use one of the following to delete a "custom action":
•In the "Actions" tab, right-click the "custom action" to access the "Delete" option and click it.

•In the tree view, right-click the "custom action" entry and select "Delete".
In both cases, the "Action" window must be closed for you to access the "Delete" option.
The "Custom Action's" Predefined Local Variables
This type of action includes the following predefined Local variable:
Variable Name |
L_Screen_Name |
Variable ID |
&0a |
Description |
Stores the current screen title (screen property that is displayed in the upper toolbar when the screen loads). |
![]()
In this case, each parameter included in the "custom action" will, automatically, generate the corresponding predefined local variable when the "custom action" is declared.