|
Publishing a Project |
  
|
Publishing a Project
|
Publishing a Project |
|
Overview
Publishing a project is usually the last step of project development. When a project is published that means that it cannot be edited anymore, it is a closed project. It is not a requirement for the uploading of the project to a device.
Before publishing a project, make sure you do not want to make any further changes.
To Publish a Project
Step-by-step
1. Ensure that the project meets all requirements and that there are no more changes to be made.
2. Go to the Menu Bar and click "Project" to open the corresponding menu.
3. Click "Publish" which opens the following window:

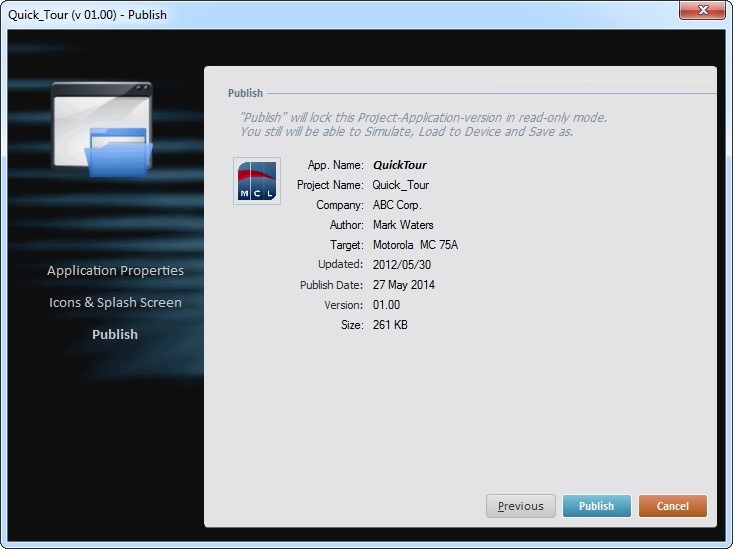
4. Verify the displayed project information and, if necessary, modify the editable options.
Application Info |
|
App. Name |
Displays the application's name. This option is editable. |
App. Code |
Refers to Unique Application ID. If required, edit the application code. |
App. Description |
Displays the description entered in the Project Properties' "Application Info" tab. This option is editable. |
Security |
Check the "Obfuscate MCL Code" option if you want the MCL code of the resulting application to be encrypted. |
Publish Date |
Displays the publish date. This option is NOT editable. |
Version |
Displays the publish version. This option is NOT editable. |
Target Device |
|
Manufacturer |
Displays the target device's manufacturer. This option in NOT editable. To do so, go to Project Properties and open the "Target Device" tab. See Target Device. |
Model |
Displays the target device's model. This option in NOT editable. To do so, go to Project Properties and open the "Target Device" tab. See Target Device. |
Publisher Info |
|
Author |
Displays the author's name. This option is editable. |
Company Name |
Displays the company's name. This option is editable. |
Contact |
Displays the author's name. This option is editable. |
5. Click ![]() to continue.
to continue.
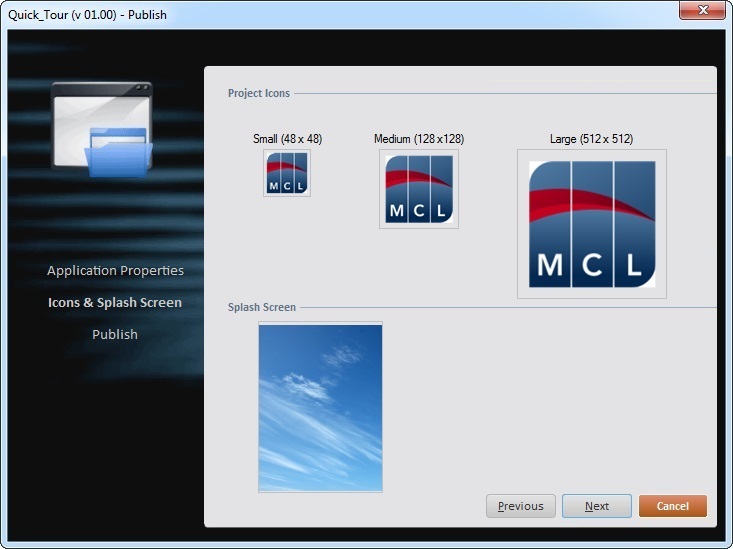
6. If required, modify the previously selected icon/splash screen options:
Project Icons |
|
Small (48x48) |
This icon represents the application and will be displayed on the device's screen. If required, you can change it: a. Click the icon to open a window with the available icons. b. Browse the existing tabs or click c. Select the new icon. d. Conclude by clicking |
Medium (128x128) |
This icon represents the application in your MCL-Mobility Platform account. If required, you can change it: a. Click the icon to open a window with the available icons. b. Browse the existing tabs or click c. Select the new icon. d. Conclude by clicking |
Large (512x512) |
This icon representing the application can be used in devices with a high resolution. If required, you can change it: a. Click the icon to open a window with the available icons. b. Browse the existing tabs or click c. Select the new icon. d. Conclude by clicking |
Splash Screen |
|
Splash Screen |
The splash screen is displayed after the device's application icon is clicked (and before it is launched). If required, click the splash screen to change it. In the resulting window, proceed as described in Splash Screen. |
7. Click ![]() to continue.
to continue.
8. Check the information. (If necessary, click ![]() to go back and edit the information).
to go back and edit the information).
Click ![]() . If the project does not contain any errors/issues, proceed to step 13.
. If the project does not contain any errors/issues, proceed to step 13.
9. If there are any errors in the project, a message box displaying the errors/issues found opens:

10. If you want to continue the operation, click ![]() and proceed to step 12. If you want to abort publishing the project to correct the errors/issues found, click
and proceed to step 12. If you want to abort publishing the project to correct the errors/issues found, click ![]() . This opens a window with a "Project Verification Report".
. This opens a window with a "Project Verification Report".

11. To correct the displayed errors/issues, click each one to open the corresponding properties window. Proceed with the required alterations. See Detail of Project Verification Report.
12. Click ![]() to update the information and/or
to update the information and/or ![]() to close the window. To resume the publishing, repeat steps 2 through 8.
to close the window. To resume the publishing, repeat steps 2 through 8.
13. Once the publishing is complete, a bar with the following information/options becomes visible:

From now on, this project is locked and can only be viewed on view mode. The only available operations regarding a published project are simulation, uploading of the project to devices or the cloud and to save the project as a new project or version.
After publishing the project, click ![]() and open a window with the following information:
and open a window with the following information:
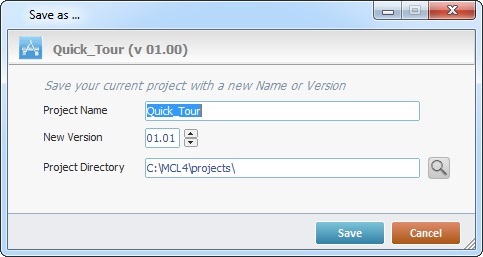
If required, edit the displayed information:
Project Name |
Enter a new name for the project. |
New version |
Enter the version's number. |
Project Directory |
Maintain the default project directory or click |
Conclude by clicking ![]() .
.