Overview
The details of an operator profile are editable.
The status of an operator profile can be changed at any time.
Step-by-step
1. Click ![]() (in the Control Panel section) and, in the resulting row below, select
(in the Control Panel section) and, in the resulting row below, select ![]() to open the "Operators" page.
to open the "Operators" page.
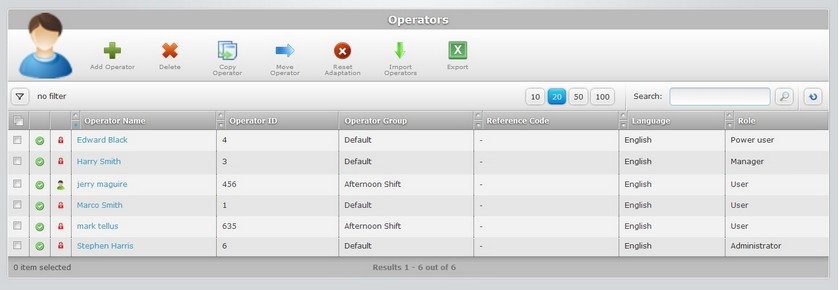
2. Select the operator you want to edit by clicking the operator's name (displayed in light blue). This opens the corresponding "Operator Details" page.
By default, the "Operator Details" page opens in the "Properties" tab.
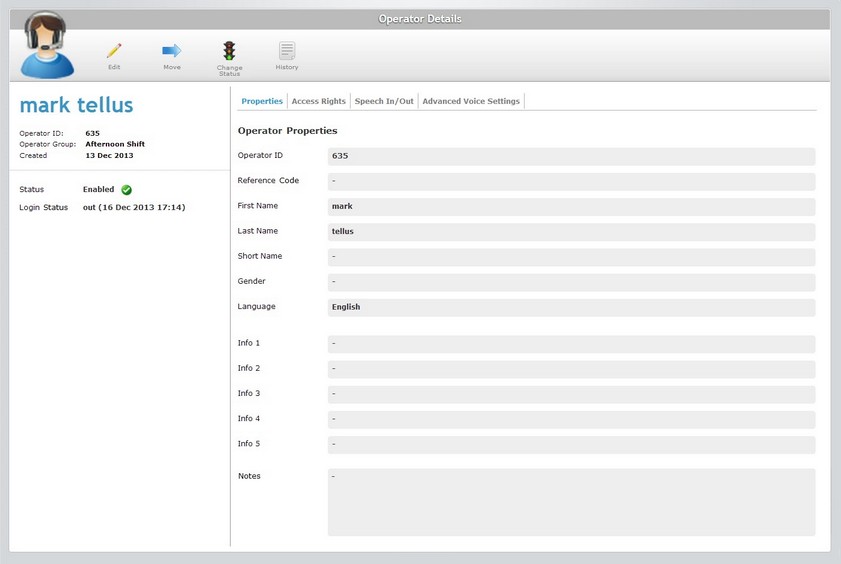
3. Click ![]() to set the page to "edit mode".
to set the page to "edit mode".
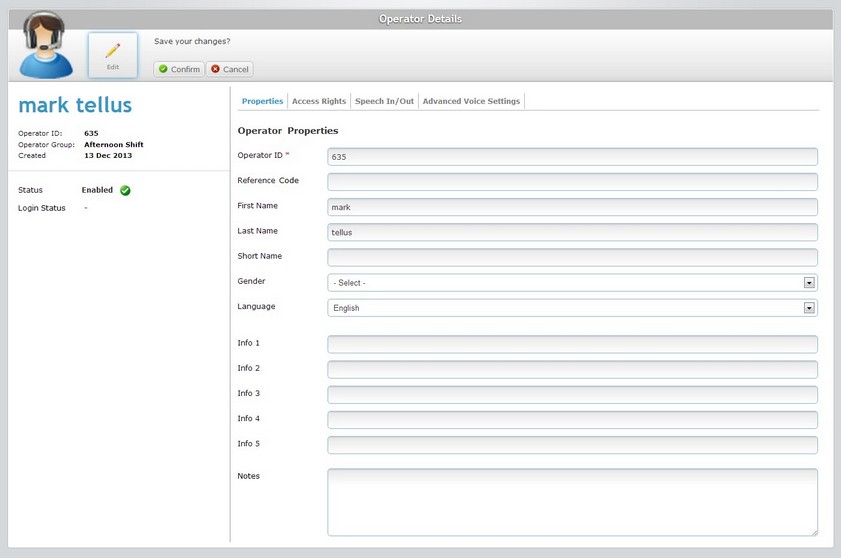
4. Edit the fields according to your requirements:
Operator ID |
Maintain or edit the operator's identification number in the account. |
Reference Code |
Maintain or edit the operator's identification in the customer's own management software system (ex: ERP or WMS systems). |
First Name |
Maintain or edit the operator's first name. |
Last Name |
Maintain or edit the operator's last name. |
Short Name |
Maintain or edit the alternative name to identify the operator. |
Gender |
Maintain or edit the operator's gender. |
Language |
Maintain or select another language to be used by the operator in the application. |
Info 1 > 5 |
Maintain or edit the internal information regarding the operator. |
Notes |
Maintain or edit the existing text. |
5. If required, go to the "Access rights". If you have finished editing the operator's details, continue to step 12.
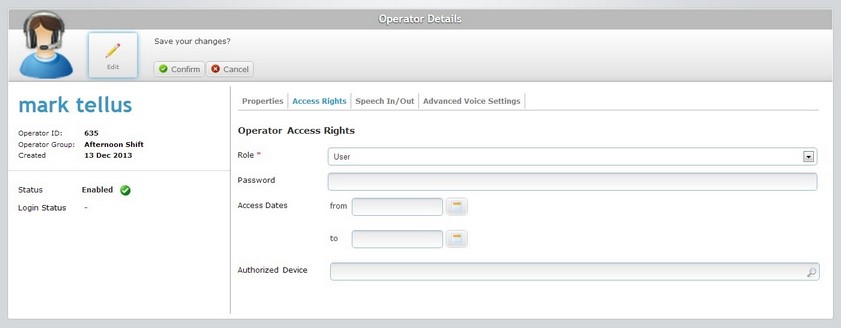
6. Edit the fields according to your requirements:
Role |
Maintain or select a different role for the operator. |
Password |
Maintain or enter a new login password for the operator. |
Access Dates |
Maintain or define another authorization time period for the operator to access the system. |
Authorized Device |
Maintain or select a device to be attributed to the operator. If no particular device is assigned, the field will display "All" which means that the operator is allowed to work with all the available devices. See Detail of "Select Device" window below. |
Detail of Select Device window
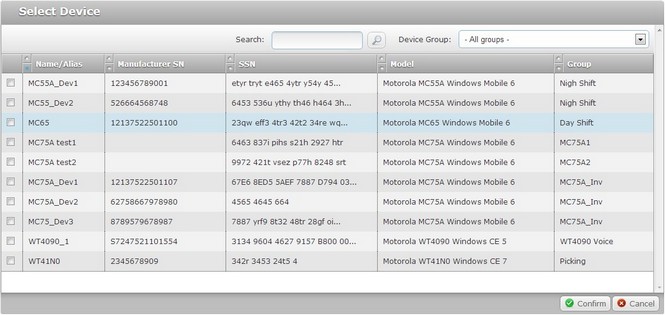
a. Click ![]() , in the "authorized device" option, to open the "Select Device" window.
, in the "authorized device" option, to open the "Select Device" window.
b. Select the device by checking the corresponding ![]() and clicking
and clicking ![]() .
.
c. If required, use the ![]() or the drop-down list with the available device groups to filter the displayed information.
or the drop-down list with the available device groups to filter the displayed information.
7. If required, go to the "Speech In/Out" tab. If you have finished editing the operator's details, continue to step 12.

8. If the operator being edited already includes voice attributes, proceed to step 9 and edit the available fields.
If the operator profile does NOT have voice attributes and you want to include them in this profile, check the "Voice attributes" box to enable further options regarding voice parameters as well as a new tab - the "Advanced Voice Settings" tab.
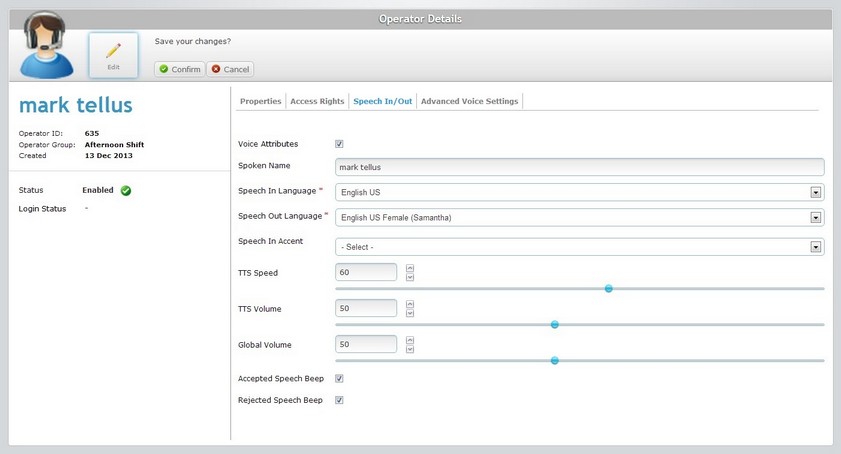
9. Edit the voice parameters as required:
Spoken Name |
Maintain or edit the name that will be prompted to the operator in the voice dialog (ex: the welcome message). |
Speech In Language |
Maintain or select another language for the operator to interact with the voice application. |
Speech Out Language |
Maintain or select another language for the voice device to interact with the operator. |
Speech in Accent |
Maintain or select a different file to store the fine tuning of voice recognition. The drop-down list displays the accent files added in the "Voice" tab included in the "Site Details" page. See "Site Details" - Voice tab. |
TTS Speed |
Maintain or define another speech speed to be used by the TTS (text to Speech) engine in the corresponding box. |
TTS Volume |
Maintain or define another speech volume to be used by the TTS (text to Speech) engine in the corresponding box. The TTS Volume only affects the Synthesizer channel. |
Global Volume |
Maintain or define a new global audio volume for the voice device in the corresponding box. |
Accepted Speech Beep |
Check/uncheck this option to enable/disable a success/confirmation beep. |
Rejected Speech Beep |
Check/uncheck this option to enable/disable an unsuccessful/rejection beep. |
10. If required, continue to the "Advanced Voice Settings" tab.
If you have concluded your edition, proceed to step 12.
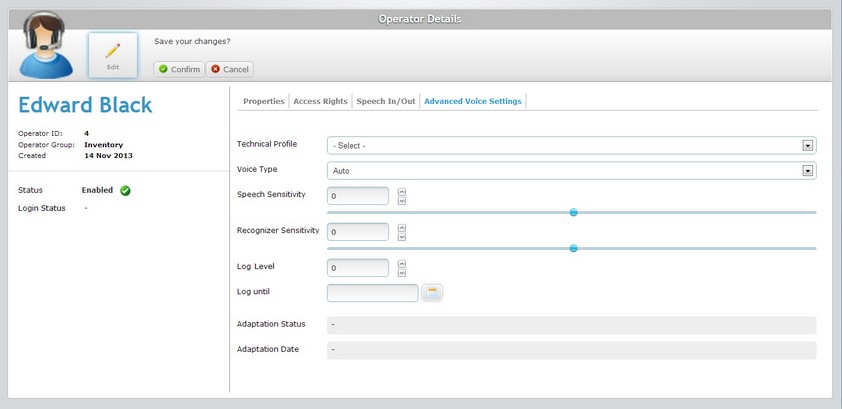
11. Edit the available fields according to your requirements:
Maintain or select a different Technical Voice Profile. The drop-down list displays the files added in the "Voice" tab included in the "Site Details" page. See "Site Details" - Voice tab. |
|||||||||||||||||||
Voice Type |
Maintain or select another voice type from the drop-down list (Auto, Neutral, Male, Female or Child). For most cases, the default value (Auto) is preferred, but you can select a more appropriate voice type for the operator. Defining the wrong voice type for the operator will affect speech recognition quality. |
||||||||||||||||||
Speech Sensitivity |
Maintain or define new speech sensitivity value for the voice devices.(available values from -3 to +3). For most cases, the default value (Auto)is the preferred choice. When defining a new value, consider the following:
Ex: For operators with a loud and clear voice, define a speech sensitivity value of -1 or -2.
Note that some words start with low energy (ex: words with an initial "sh" sound) which means they might not be detected if the speech sensitivity value is too low.
|
||||||||||||||||||
Recognizer Sensitivity |
Maintain the value or define another Recognizer Sensitivity value (available values from -3 to +3) in the corresponding box. When altering the Recognizer Sensitivity value, consider the following:
Ex: Too low recognizer sensitivity dismisses background noise but does NOT accept an operator's "poor" speech.
Possible settings based on general considerations:
Fine tuning suggestions:
|
||||||||||||||||||
Log Level |
Maintain or enter a new value. (1 = enabled, 0 = disabled. The other levels are not supported, at the moment.) |
||||||||||||||||||
Log until |
Maintain the date or click |
||||||||||||||||||
Adaptation Status |
This field is NOT editable. Its content depends on the optional voice adaptation performed by the operator. See The Adaptation Process. |
||||||||||||||||||
Adaptation Date |
This field is NOT editable. Its content depends on the optional voice adaptation performed by the operator. See The Adaptation Process. |
12. Once you have executed all the required modifications, click ![]() to apply all the changes.
to apply all the changes.
To change an Operator Profile's Status
There are 3 available operator profile statuses:
Enabled: The operator is active and able to login.
Disabled: The operator is inactive and unable to login.
Locked: Operationally speaking, this status is the same as the "Disabled" status - the operator cannot login to the site. The customer can use this status from an operator management point of view, depending on the site's internal organization/operations.
Step-by-step
1. In the selected operator's "Operator Details" page, click ![]() .
.
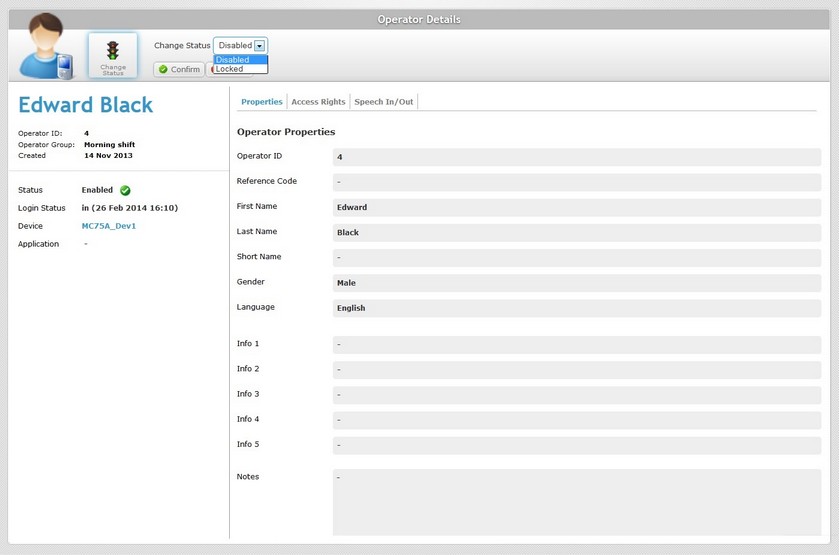
2. Select the required option from the drop-down list. Depending on the operator's current status (enabled/disabled/locked), the available options will be the remaining ones.
Ex: The operator "Edward Black" currently has an "Enabled" status. Therefore, the available options for status change are "Disabled" and "Locked".
3. Click ![]() to conclude the changing status operation.
to conclude the changing status operation.
The new status is displayed in the "Status" field, to the left.
In order to improve voice recognition performance, you can use an adaptation process which will analyze and store operator pronunciation characteristics (accent). This adaptation is very useful for non-native speakers, speakers with accents or special voice characteristics because it improves overall recognition performance for that particular operator.
When the operator logs in, the device communicates with the account to verify if no adaptation has already been performed. If no adaptation data exists, an automatic procedure is set on the device to execute the adaptation process.
The adaptation process consists of data collection (the operator repeating key words and expressions that will be used to interact with the application in the voice device) and accent analysis (the resulting file stores that operator's pronunciation characteristics which is analyzed).
The adaptation's objective is to improve the voice device's recognition of that operator.
Once the operator has executed an adaptation, you can reset said adaptation, meaning, you can delete it. To do so, follow these steps:
To reset an Operator's Adaptation
Step-by-step
Keep in mind that there are two locations to execute this operation:
1. In the "Operators" page OR in the selected operator's "Operator Details" page (in which case, the operator must NOT be logged in).
2. If the reset operation is executed in the "Operators" page, select the operator(s) to have the adaptation reset by checking the corresponding ![]() .
.
If you are executing the "reset adaptation" in "Operator Details" page, continue to step 3.
3. Click ![]() .
.

4. Click ![]() to conclude the operation.
to conclude the operation.
At this point, the ![]() disappears from the header of the "Operator Details" page and the corresponding information in the "Advanced Voice Settings tab ("Adaptation Status" and Adaptation Date" fields) disappears.
disappears from the header of the "Operator Details" page and the corresponding information in the "Advanced Voice Settings tab ("Adaptation Status" and Adaptation Date" fields) disappears.
When the operator logs in again, he will be asked to execute a new adaptation.