Overview
The Operator details page focuses mostly on the operator's identification, corresponding access rights and, if the operator is to work with voice applications, the operator's voice attributes.
Click ![]() (in the Control Panel section) and, in the resulting row below, select
(in the Control Panel section) and, in the resulting row below, select ![]() to open the "Operators" page.
to open the "Operators" page.
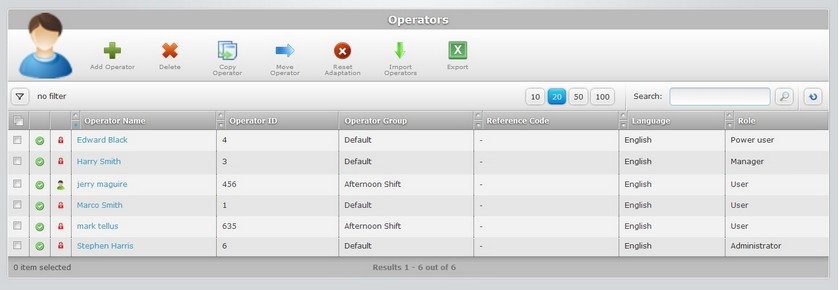
Select the operator you want to view by clicking the operator's name (displayed in light blue). This opens the corresponding "Operator Details" page which includes four tabs (Properties, Access Rights, Speech In/Out and, if the operator includes Voice attributes, Advanced Voice Settings) and a "left panel".
By default, the "Operator Details" page opens in the "Properties" tab.
Properties tab
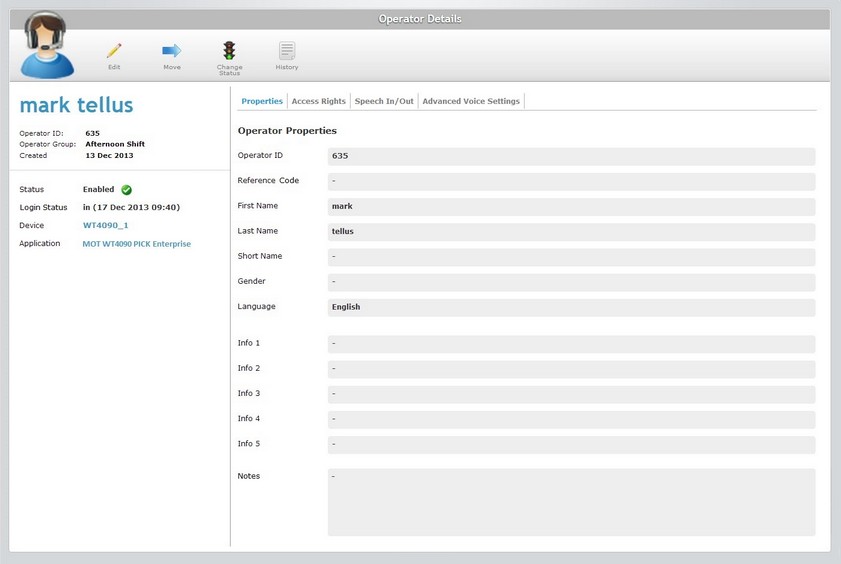
This tab displays the following information:
Operator ID |
The operator's identification number in the account. |
Reference Code |
The operator's identification in the customer's own management software system (ex: ERP or WMS systems).
When developing an application with MCL-Designer, you can use one of their system variables (X_USR_REF) to link the information you enter in this field to the application itself |
First Name |
The operator's first name. |
Last Name |
The operator's last name. |
Short Name |
An alternative name to identify the operator. |
Gender |
The operator's gender. |
Language |
The language used by the operator in the application. |
Internal information regarding the operator. The field labels can be customized to display something other than "Info...". See "Editing Site Details" - Custom Field Labels tab.
When developing an application with MCL-Designer, you can use system variables to link the information you enter in these fields to the application itself. Ex: If you use the X_USR_CUST3 system variable within an MCL Designer developed application, you can retrieve the information entered in this field. |
|
Notes |
Free text field that can include information on the operator. |
Access Rights tab
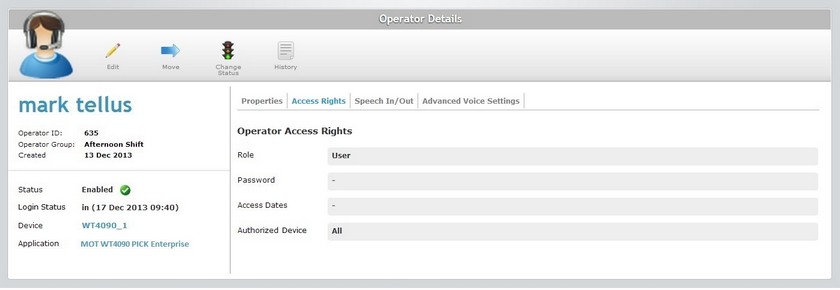
This tab displays the following information:
Role |
The operator's role within the application. |
Password |
The operator's login password to the system. |
Access Dates |
The period of time that the operator is authorized to access the application(s). If this field is not filled, the operator has no time access restrictions. |
Authorized Device |
The device that was attributed to the operator. If no particular device is assigned, the field will display "All" and it means that the operator is allowed to work with all the available devices. |
Speech In/Out tab
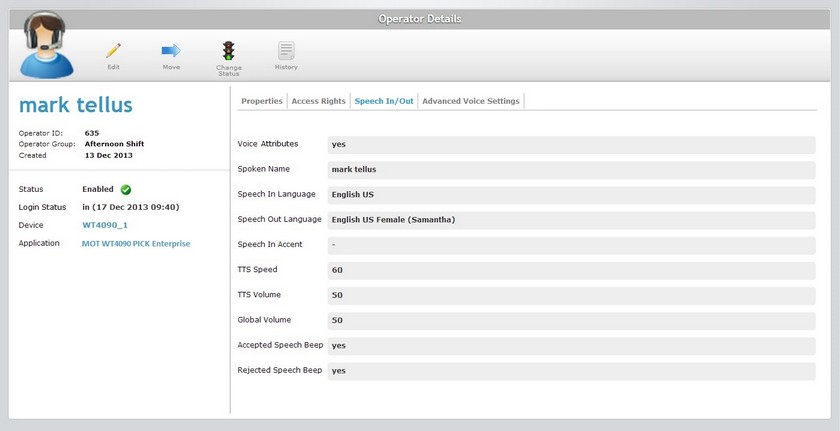
Depending on whether the operator includes voice attributes or not, the displayed information is different.
If the "Voice attributes" option displays "no" there will be no further fields displayed.
If the operator has voice attributes (the corresponding box display "yes") you will access another tab ("Advanced Voice Settings") and the following information in the current tab:
Spoken Name |
The operator's name that is prompted to the operator in the voice dialog (ex: a welcome message). |
Speech In Language |
The language used by the operator to interact with the voice application. |
Speech Out Language |
The language the operator will hear from the voice device. |
Speech in Accent |
The accent file that stores the fine tuning of voice recognition (voice transcriptions for the original spoken word). |
TTS Speed |
The speed used by the TTS (text to Speech) engine. |
TTS Volume |
The speech volume used by the TTS (text to Speech) engine. The TTS Volume parameter affects the Synthesizer channel only (TTS). |
Global Volume |
The global audio volume of all channels (recognition/rejection beep, application beep, TTS, wave player, etc.). |
Accepted Speech Beep |
yes (if the success/confirmation beep is enabled) or no (if the success/confirmation beep is not enabled). |
Rejected Speech Beep |
yes (if the unsuccessful/rejection beep is enabled) or no (if the unsuccessful/rejection beep is not enabled). |
Advanced Voice Settings tab
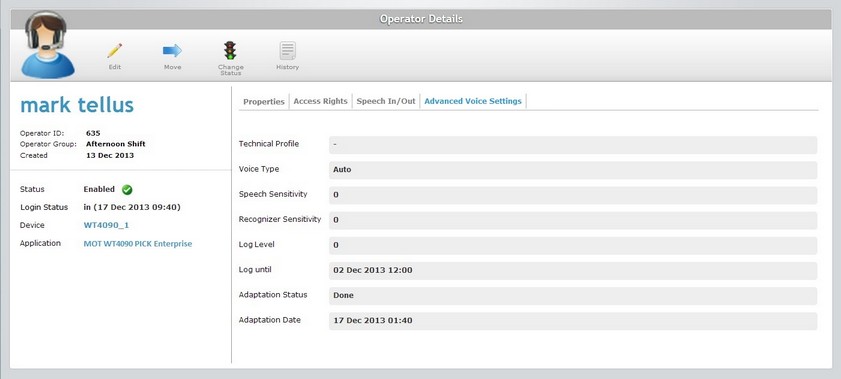
This tab, which can only be viewed if the operator includes voice attributes, displays the following information:
Technical Profile |
The Technical Voice Profile is a configuration file, provided by MCL, that allows for the fine tuning of the MCL Voice Client behavior. See "Editing Operator Details" Advanced Voice Settings Tab. |
||||||||||||||||||
Voice Type |
The available voice types are Auto, Neutral, Male, Female or Child. The default value is Auto. This parameter is responsible for the filtering of the speech signal spectrum and its purpose is to optimize user speech decoding. When the voice type is set to "Auto", the system executes an adaptation, over time, to match the speech input signal. If you select another voice type (Neutral, Male, Female or Child), this progressive auto adjustment is bypassed, providing better initial performance. Defining the wrong voice type will affect speech recognition quality. This parameter consists of pure front-end audio filtering and has nothing to do with phonemes or recognition algorithms. The fine tuning starts each time the voice profile is loaded into memory. |
||||||||||||||||||
Speech Sensitivity |
(Aka Microphone Sensitivity) It defines the "Speech detection" levels that will "isolate" background noise from actual speech based on the received energy level. (Available values from -3 to +3). A high speech sensitivity helps detect a low energy speech (operator with a soft voice) but it increases the risk of noise processing. A low speech sensitivity reduces the risk of noise processing but requires a high energy speech (operator must speak loud and clear) for a good detection.
For operators with a loud and clear voice, define a speech sensitivity value of -1 or -2.
Note that some words start with low energy (ex: words with an initial "sh" sound) which means they might not be detected if the speech sensitivity value is too low.
|
||||||||||||||||||
Recognizer Sensitivity |
This parameter defines the general acceptance balance regarding recognized words. Its purpose is to match the operator's speech to the expected words. (Available values from -3 to +3). When setting the recognizer sensitivity value, you must take the operator's speech level into account: a good speech -high energy/loud and clear word pronunciation. a poor speech -low energy and bad word pronunciation. Also, consider the operator's environment and if the resulting background noise level can interfere with word recognition. Ex: Too low recognizer sensitivity dismisses background noise but does NOT accept an operator's "poor" speech.
Possible settings based on general considerations:
Fine tuning suggestions:
|
||||||||||||||||||
Log Level |
The level of voice log. (1 = enabled, 0 = disabled. The other levels are not supported, at the moment.) |
||||||||||||||||||
Log until |
When the logs stop being generated. |
||||||||||||||||||
Adaptation Status |
"Done" refers to the voice profile adaptation performed by the voice operator. If there is no adaptation, the field is blank. See The Adaptation Process. |
||||||||||||||||||
Adaptation Date |
Refers to when the latest adaptation process was executed. See The Adaptation Process. |
"Left Panel"
|
(in blue) |
The operator's name (first and last). |
Operator ID |
The operator's identification number in the account. |
|
Operator Group |
The operator group the operator is included in. |
|
Created |
When the operator's profile was created. |
|
Status |
The operator's profile status (Enabled/Disabled/Locked). |
|
Login Status |
"in/out + date" - Informs if the operator is logged in or out of the system and when the operator is logged in or has logged out. |
|
Device |
The device being used by the operator. If you click it, you access the corresponding "Device Details" page. See Device Details. |
|
Application |
The application the operator has logged in. If you click it, you access the corresponding "Application Details" page. See Application Details. |
If you want to edit the details of an operator, click ![]() to set the corresponding "Operator Details" page to "edit mode". For more detailed information, see Editing Operator Details.
to set the corresponding "Operator Details" page to "edit mode". For more detailed information, see Editing Operator Details.
Available Operations
The "Operator Details" also provides access to certain operations regarding operators:
To move an operator profile to another operator group, use ![]() . For more detailed information, see Moving an Operator.
. For more detailed information, see Moving an Operator.
To change the operator's status, use ![]() . For more detailed information, see To Change an Operator Profile's Status.
. For more detailed information, see To Change an Operator Profile's Status.
To view the operator's login history, click![]() to open the corresponding "Operator History" window. For more detailed information, see Detail of Operator History window below.
to open the corresponding "Operator History" window. For more detailed information, see Detail of Operator History window below.
Detail of Operator History window
This window presents the operator's login and log out history.

Operator History navigation
You can control the information that is displayed. To do so, use the following buttons/boxes:
![]() You can filter the information available by focusing on a specific period of time. By default, the displayed information regards the current day. To establish a time frame for the displayed information, proceed as follows:
You can filter the information available by focusing on a specific period of time. By default, the displayed information regards the current day. To establish a time frame for the displayed information, proceed as follows:
1. Click the corresponding ![]() to open a calendar.
to open a calendar.
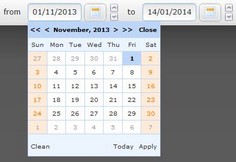
2. Select the appropriate date. Use the <</</>/>> to navigate the months/years.
If you want to clear any information, click ![]() .
.
If you want to select the current date, click ![]() .
.
If you want to exit the calendar, click ![]() .
.
3. Click ![]() and the information is viewed on the corresponding box.
and the information is viewed on the corresponding box.
![]()
You can enter the required date on the corresponding boxes. Make sure you enter DD/MM/YYYY(space)HH:MM.
![]() Use these buttons to control the amount of listed items displayed per page. Click the appropriate button.
Use these buttons to control the amount of listed items displayed per page. Click the appropriate button.
![]() Use the search box to filter the information:
Use the search box to filter the information:
a. Enter what you want to search for.
b. Click ![]() or press <ENTER> in your PC keyboard to initiate the search.
or press <ENTER> in your PC keyboard to initiate the search.
c. To conclude the search operation, empty the search box and click ![]() or press <ENTER> in your PC keyboard.
or press <ENTER> in your PC keyboard.
![]() These navigation buttons are only active, if the listed items are spread over more than one page. Use these buttons to navigate between pages.
These navigation buttons are only active, if the listed items are spread over more than one page. Use these buttons to navigate between pages.
Available operations in Operator History window
![]() Click this button to refresh the displayed information.
Click this button to refresh the displayed information.
![]() Click this button to download the information included in the "Operator History" window.
Click this button to download the information included in the "Operator History" window.
The conclusion of this operation depends on the web browser used. You should be able to save the file in your local computer or open it directly after the download.
Click ![]() to exit the window and return to the "Operator Details" page.
to exit the window and return to the "Operator Details" page.
To reset an adaptation, use ![]() . This button is only enabled if an adaptation process has been performed and if the operator responsible for the adaptation has since logged off. For more detailed information, see The Adaptation Process.
. This button is only enabled if an adaptation process has been performed and if the operator responsible for the adaptation has since logged off. For more detailed information, see The Adaptation Process.