Adding a SoftKey Control to a Screen
Control Purpose
This control is used to represent a key on the device's keyboard that is defined at screen level (as a "Hotkey" action). It can be displayed with text or images.
If the project includes speech attributes, it will also be possible to associate a speech related command to the SoftKey control ("Volume Up>"; "TTS Slower>"; "Audio Calibration>"; etc.).
Ex: If a SoftKey is associated to a "Volume Down" command, it means that the operator can press that SoftKey to lower the volume of the application's speech prompts.
The SoftKey control can also be used to launch a virtual keyboard, if you associate the control to the "<Open SIP>" function (the operator presses the SoftKey to open a SIP keyboard and presses it again to close it).
You can drag a SoftKey control ![]() from the top section of the "Control" tab OR the Style Preview section onto the screen.
from the top section of the "Control" tab OR the Style Preview section onto the screen.
Step-by-step
1. Drag the control onto the screen:
•If dragged from the "Control" tab, the control will assume the default style. (See Set Default.)
•If dragged from the Style Preview section, it will assume that particular style.
2. Now, double-click the selected control on the screen OR the tree view to open the properties window.

3. In the "General" tab, add text and/or an image to the SoftKey control which is displayed on the device's screen.
a. In the "Text" box, enter the required text or click
b. Continue to step 5.
|
Browsing for a project resource:
a. In the "Image" box, click
This window allows you to control the displayed images:
•Click
•Use
Right-clicking an existing image resource, opens a menu with several options. The available options vary according to the resource's location (the tab that includes the selected image). Below are all the possible options:
b. Open the tab that contains the image you want to use.
c. Select the image.
d. Click
Importing an Image
Instead of selecting an image from the available tabs, you can import the required image from an outside source:
a. Click
b. Browse for the required image and select it.
c. Click
No matter which tab you had open when you clicked
d. In the "Project Resources" tab, select the image you have imported.
e. Click
Using Drag-and-Drop
Drag the intended image from an OS browse window and drop-it in the "Image" field.
|
4. There is an advanced option regarding the image element that allows you to rotate or flip the selected image:
If required, right-click the "Image" option to access the "Advanced Image Settings" option and follow the steps described in The Display of a Control's Image Element.
5. Check the desired position of the image inside the SoftKey control (either "Top", "Bottom", "Left" or "Right"). These options only become active after an image is selected.
6. Select the key on the device's keyboard that will have the same function as the SoftKey control.
Select it from the drop-down in the "Key" box.
If the current project is a speech project, there will be speech commands available as well:
|
Speech Function you can associate to the SoftKey |
SoftKey's expected behavior when pressed |
||||||
<Pause> |
Pauses the speech application flow. |
|||||||
<Resume> |
Resumes the speech application's flow. |
|||||||
<Volume Up> |
Turns up the volume of the speech application's prompts. |
|||||||
<Volume Down> |
Turns down the volume of the speech application's prompts. |
|||||||
<TTS Faster> |
Increases the speed of the speech application's prompts. |
|||||||
<TTS Slower> |
Decreases the speed of the speech application's prompts. |
|||||||
<Audio Calibration> |
Triggers a calibration to be performed by the operator. See Calibration. |
|||||||
<Repeat Prompt> |
Triggers a repetition of the prompt last heard by the operator. |
|||||||
<Show User Profile> |
Displays a window with the speech parameters of the logged in operator's speech profile (which can be edited) and other speech related options:
There is also a speech input energy meter to show the energy level of the operator's speech input.
See Speech Setup Window for more details. |
|||||||
<TTS Pitch Lower> |
Decreases the pitch of the speech application's prompts. |
|||||||
<TTS Pitch Higher> |
Increases the pitch of the speech application's prompts. |
|||||||
<Toggle Pause/Resume> |
Alternates between the speech's "Pause" and "Resume". |
![]()
The objective/function of this SoftKey will be attributed at screen level (in the "Actions" tab of the "Screen Properties" window in the form of a "Hotkey" action. This action will contain an action to mirror the function of the key selected on the "Key" box of the above mentioned "General" tab).
7. Go to the "Layout" tab.

8. Define the control's style by selecting an option in the drop-down OR by clicking ![]() . See Editing and Creating Styles and Editing and Creating the SoftKey Style.
. See Editing and Creating Styles and Editing and Creating the SoftKey Style.
9. Position the text, within the control, with the alignment buttons.
10. Use the ![]() button to define if the text is meant to be displayed in a single or in multiple lines. Click the button to the intended state:
button to define if the text is meant to be displayed in a single or in multiple lines. Click the button to the intended state:
If selected ( ![]() ), the control's text can be displayed within multiple lines.
), the control's text can be displayed within multiple lines.
If deselect ( ![]() ), the text will ONLY be displayed within a single line.
), the text will ONLY be displayed within a single line.
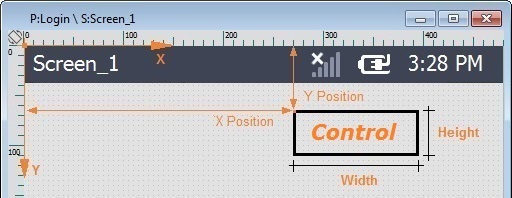
11. Maintain the given values or specify the control's position/size, within the screen, by providing the "X" and "Y" coordinates as well as "Width" and "Height".
Detail of Position/Size values

12. In the "Control Settings" section, attribute a name to the control. This name is displayed in the tree view.
13. Consider whether or not to check the following options:
"Enable"
Activates the control's features.
"Visible"
Controls the visibility of the control on the device's screen.
"Auto Refresh"
Enables an automatic update of the visible information every time the used variable's value is modified.
Before concluding the addition operation, check the following:
![]() Remember that the "Enable" option (located in the "Layout" tab) must be checked so that the added processes run.
Remember that the "Enable" option (located in the "Layout" tab) must be checked so that the added processes run.
![]()
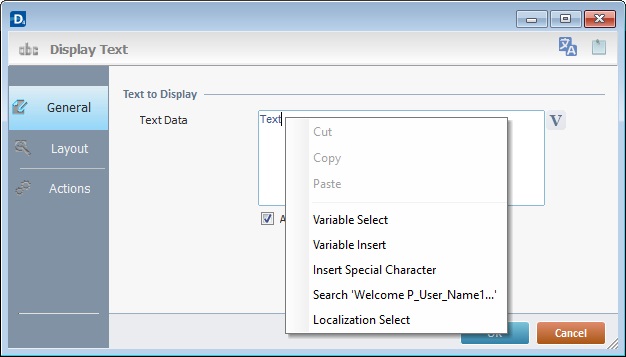
Use the right-click in MCL-Designer's input boxes to access some related options as well as the general "Cut"; "Copy"; "Paste"; "Search"actions (active/inactive according to the current context).
Ex: If you right-click the "Text Data" input box (included in a Display Text properties window), you are provided with the general editing/search actions and other specific options such as "Variable Select" (see "Variable Select") ;"Variable Insert" (see "Variable Insert"), "Insert Special Character" (see To Insert Special Characters into a Control's Text Input Field) and "Localization Select" (see Localization List).
If you right-click any other input box, it may provide other possibilities.

14. If required, use the icons located on the upper right corner of the properties window:
![]()
Click this icon to open a "Localization" window where you can edit the text element within that control or add translations to it. See Localization.
![]()
Click this icon to attach any relevant notes to this control. Enter your text in the resulting window.The entered information is displayed in the "Developer report". See Report.
15. Click ![]() to apply the choices made in both tabs.
to apply the choices made in both tabs.
The SoftKey control has been successfully added to the screen.

![]() To activate an instant edit mode for the Softkey's text, select it and press the "<space>" key. When you are done editing the control's text element, press "<Enter>" or click outside the control's area to set it back to view mode.
To activate an instant edit mode for the Softkey's text, select it and press the "<space>" key. When you are done editing the control's text element, press "<Enter>" or click outside the control's area to set it back to view mode.
![]()
If any subsequent edition of the control's properties is required, double-click the SoftKey OR select "Edit" (in its right-click menu) to open the properties window.
If you want to view this control applied within an application, see Sample Applications.