|
Detailing the Icon Shortcut Bar |
  
|
Detailing the Icon Shortcut Bar
|
Detailing the Icon Shortcut Bar |
|
Overview
The Icon Shortcut Bar is divided into several sections according to the use of each icon group. This chapter will deal with each group separately.

File section
"Home" icon
Clicking this icon provides access to the following options:

"New"
![]() Is used to create a new project. See Creating a New Project.
Is used to create a new project. See Creating a New Project.
"Recent Projects"
This area displays a list of the most recently opened projects. It also informs you which MCL-Designer's version you are working with and provides an exit from MCL-Designer V4 by clicking ![]() .
.
"Open"
![]() Is used to open previously created projects from the default project's folder. The location of the default project's folder can be modified in the "Designer Setup" option, accessed via the "Tools" menu (see Detail of MCL-Designer Setup). When you click it, it opens the following window:
Is used to open previously created projects from the default project's folder. The location of the default project's folder can be modified in the "Designer Setup" option, accessed via the "Tools" menu (see Detail of MCL-Designer Setup). When you click it, it opens the following window:

The window is divided into 4 sections:
•Search box
Enables you to search for a specific project. Enter the information in ![]() and the results are automatically displayed below.
and the results are automatically displayed below.
•Main Section
Displays the existing projects in the default project's folder. Select the desired project and click ![]() to open its current version.
to open its current version.
To browse for projects in different folders/locations, click ![]() in the lower left corner of the window.
in the lower left corner of the window.
•Project's Info
Provides details of the selected project in the "Main Section"(name; author; company; target device, creation date and update date).
•Project's Version(s)
Displays the existing versions of the selected project in the "Main Section". If you want to open a particular version of the selected project, double-click it OR select it and click ![]() .
.
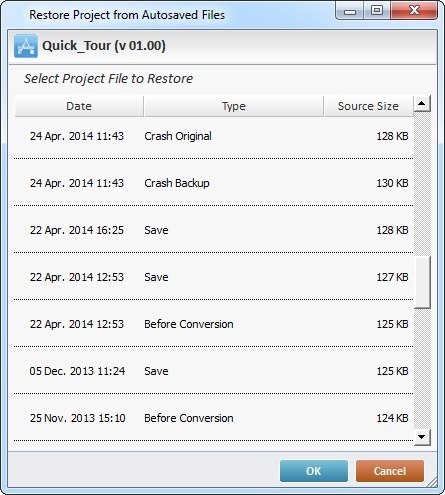
If you click each version's corresponding ![]() , it opens a window with the selected version's restore points:
, it opens a window with the selected version's restore points:
To open a specific restore point, select it and click ![]() OR double-click it.
OR double-click it.
Once the intended version/restore point is open, there is the possibility to edit or save it as a new version.
Operations available in the "Select a Project" window
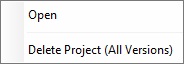
•Right-click a project with several versions in the "Main Section"(version > 01.00) to open a menu with the following options:
▪If the selected option is "Delete Project (All Versions)", a confirmation window is displayed:

Click ![]() to confirm or
to confirm or ![]() to cancel.
to cancel.
•Right-click a version of a project (in the "Project's Version(s)" section) to open a menu with the following options:

▪If the selected option is "Delete Version", a confirmation window is displayed:
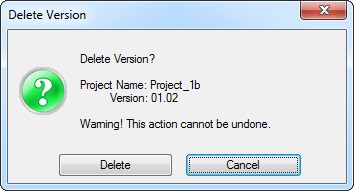
Click ![]() to confirm or
to confirm or ![]() to cancel.
to cancel.
▪If the selected option is "Delete Project (All Versions)", a confirmation window is displayed:
Click ![]() to confirm or
to confirm or ![]() to cancel.
to cancel.
•When you open a project that was created in a previous MCL-Designer version, a yellow bar is displayed to provide options to save, convert to the current MCL-Designer V4 version and/or edit that project's version.
The images below illustrate different bars for different situations - the available options depend on the current MCL-Designer version and the MCL-Designer version the selected project was created in:
There is a message referring that the project you want to open was created in an MCL-Designer version previous to the current one.
The available options are:
![]() Use it to execute the project's conversion into the new MCL-Designer version. Operationally speaking, the converted project becomes a new project but maintains its name and version number. The original project (prior to conversion) is lost.
Use it to execute the project's conversion into the new MCL-Designer version. Operationally speaking, the converted project becomes a new project but maintains its name and version number. The original project (prior to conversion) is lost.
![]() Use it to execute the project's conversion into the new MCL-Designer version (with a different name or an incremented version number) and, at the same time, maintain the project's previous version. Both project versions are saved into the "Projects" folder.
Use it to execute the project's conversion into the new MCL-Designer version (with a different name or an incremented version number) and, at the same time, maintain the project's previous version. Both project versions are saved into the "Projects" folder.
![]() When using this option, remember that you are converting the project. So, you must define a new name or a new version or both for the project version you want to save. It cannot maintain the old name and version number.
When using this option, remember that you are converting the project. So, you must define a new name or a new version or both for the project version you want to save. It cannot maintain the old name and version number.
![]()
Before a “Convert” or “Convert to” operation, the project is always in a "Read Only" compatibility mode – some options will be inactive (greyed out).
As for the options that are available, any changes to the project before the conversion is executed are applied after the conversion.
1. Maintain the version's name or enter a new one.
2. Maintain or increase/decrease the version's number.
3. Maintain the version's location (in the "Projects" folder) or click ![]() and browse for a new location.
and browse for a new location.
4. Click ![]() to apply or
to apply or ![]() to abort the operation.
to abort the operation.
![]() This option is only available within an MCL-Designer version that is higher than 4.4.3-1300 and for projects that have been created within a 4.4.3-1300 version or higher of MCL-Designer.
This option is only available within an MCL-Designer version that is higher than 4.4.3-1300 and for projects that have been created within a 4.4.3-1300 version or higher of MCL-Designer.
Use this option to retrieve the MCL-Designer version that was used to create the selected project. There is no conversion, the current/up to date version of MCL-Designer is closed and the selected project's original MCL-Designer version is opened.
There is a message referring that the project you want to open was created in an MCL-Designer version previous to the current one.
The options available are:
![]() This option is only available within an MCL-Designer version that is higher than 4.4.3-1300 and for projects that have been created within a 4.4.3-1300 version or higher of MCL-Designer and if the difference between the current MCL-Designer version and the version that the project was created in consists of minor updates (ex: a maintenance release). Use it to open the project in the up-to-date version of MCL-Designer - there is no conversion.
This option is only available within an MCL-Designer version that is higher than 4.4.3-1300 and for projects that have been created within a 4.4.3-1300 version or higher of MCL-Designer and if the difference between the current MCL-Designer version and the version that the project was created in consists of minor updates (ex: a maintenance release). Use it to open the project in the up-to-date version of MCL-Designer - there is no conversion.
![]() This option is only available within an MCL-Designer version that is higher than 4.4.3-1300 and for projects that have been created within a 4.4.3-1300 version or higher of MCL-Designer.
This option is only available within an MCL-Designer version that is higher than 4.4.3-1300 and for projects that have been created within a 4.4.3-1300 version or higher of MCL-Designer.
Use this option to retrieve the MCL-Designer version that was used to create the selected project. There is no conversion, the current/up to date version of MCL-Designer is closed and the selected project's original MCL-Designer version is opened.
![]() Only available in an MCL-Designer version that is higher than 4.4.3-1300 for a project that was created in a 4.4.3 or higher version. Click it to disable the
Only available in an MCL-Designer version that is higher than 4.4.3-1300 for a project that was created in a 4.4.3 or higher version. Click it to disable the ![]() option when MCL-Designer has a minor update (an update that does NOT require conversion - ex: a maintenance release).
option when MCL-Designer has a minor update (an update that does NOT require conversion - ex: a maintenance release).
•If you click ![]() and open a published project, it is possible to create a new version of that published project to change it. Depending on the opened/up-to-date MCL-Designer version and the version that the project was created in, you will view a yellow bar with different options:
and open a published project, it is possible to create a new version of that published project to change it. Depending on the opened/up-to-date MCL-Designer version and the version that the project was created in, you will view a yellow bar with different options:
![]() Clicking this option enables the editing of the newly opened project version. See Save as.
Clicking this option enables the editing of the newly opened project version. See Save as.
![]() Only available in an MCL-Designer version that is higher than 4.4.3-1300 for a project that was created in a 4.4.3 or higher version.
Only available in an MCL-Designer version that is higher than 4.4.3-1300 for a project that was created in a 4.4.3 or higher version.
Clicking this option retrieves the MCL-Designer version that was used to create the selected project. The current/up to date version of MCL-Designer is closed and the selected project's original MCL-Designer version is opened.
![]() Only available in an MCL-Designer version that is higher than 4.4.3-1300 for a project that was created in a 4.4.3 or higher version. Click it to disable the
Only available in an MCL-Designer version that is higher than 4.4.3-1300 for a project that was created in a 4.4.3 or higher version. Click it to disable the ![]() option when MCL-Designer has a minor update (an update that does NOT require conversion - ex: a maintenance release).
option when MCL-Designer has a minor update (an update that does NOT require conversion - ex: a maintenance release).
•It is possible to develop speech and non-speech applications with MCL-Designer V4 (depending on your subscription). Speech applications are identified with a ![]() .
.
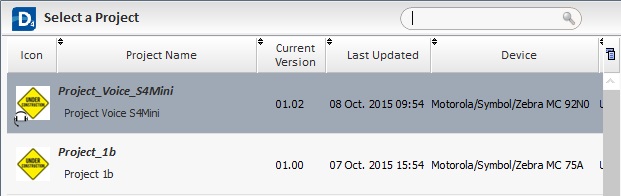
•If you attempt to open a speech application within an MCL-Designer V4 that does NOT have enabled Speech attributes, you will get the following error message and the operation will be aborted.

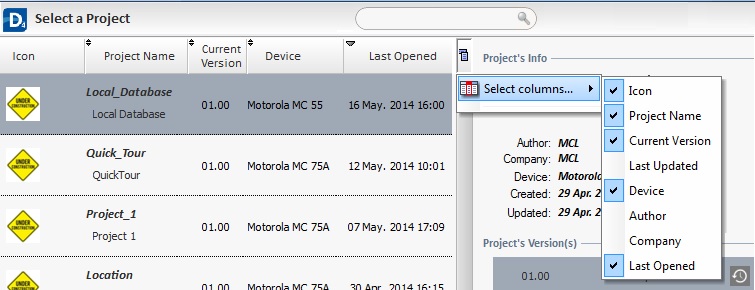
•If required, you can control the display of information in the "Select a Project" window:
▪On the upper right corner of the "Select a Project" window, click ![]() to hide the Project's Info and Project's Version(s) sections and
to hide the Project's Info and Project's Version(s) sections and ![]() to display them again.
to display them again.
▪Click ![]() , mouse over the
, mouse over the ![]() button and, then, check/uncheck the columns as required.
button and, then, check/uncheck the columns as required.
Save
![]() Is used to save the project changes in the corresponding .mprj file and sources (located in the previously defined project's folder). This option affects the project’s .mprj file and sources, it does NOT create/update the project’s PDK file
Is used to save the project changes in the corresponding .mprj file and sources (located in the previously defined project's folder). This option affects the project’s .mprj file and sources, it does NOT create/update the project’s PDK file
Save as
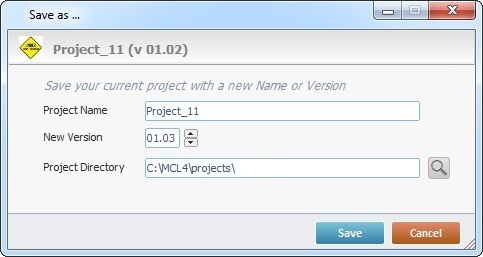
![]() Is used to save the current project with a new name or information, meaning, it actually creates a new project with its own .mprj file and new sources. This option does NOT affect PDK files. In the resulting window, fill in the available options.
Is used to save the current project with a new name or information, meaning, it actually creates a new project with its own .mprj file and new sources. This option does NOT affect PDK files. In the resulting window, fill in the available options.
1. Enter the new version's name.
2. Maintain or increase/decrease the version's number.
3. Maintain the new version's location ( in the project's folder) or click ![]() and browse for a new location.
and browse for a new location.
4. Click ![]() to apply or
to apply or ![]() to abort the operation.
to abort the operation.
Report
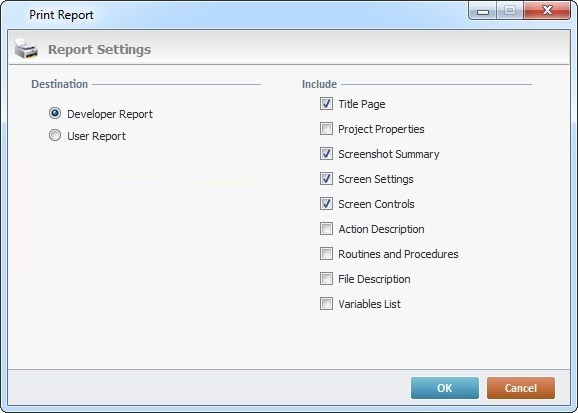
![]() Is used to create an account of a project's details such as all the specifications and screen shots. A report can be customized to include only the details you specified in the "Report Settings" window.
Is used to create an account of a project's details such as all the specifications and screen shots. A report can be customized to include only the details you specified in the "Report Settings" window.
Configure the "Report Settings" by checking the details you want to have included in the report.
Destination: Developer Report |
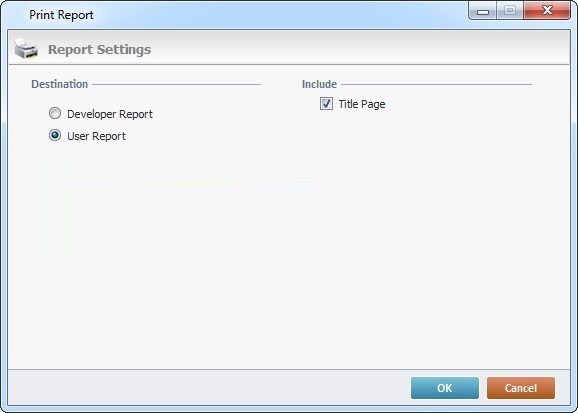
Destination: User Report |
"Developer Report"
Creates a detailed account of all the project settings, like screen properties, routines, procedures, screen shots and more. The Developer Report is ideal to document all the project's characteristics for support or reference.
"User Report"
Creates a document that includes developer comments for the end-user of the project. The User Report is ideal for creating a user guide (or manual) based on technical information provided by the project developer, which is intended to provide help to anyone using the project.
![]()
If the current project includes more languages than the "Native Language", there will be a related section ("Localization (Screenshot)") available.
Select the language of the report from the corresponding drop-down.
|
|
After configuring the report, click ![]() to create it - it is generated as a PDF and will open, automatically, using your default PDF reader.
to create it - it is generated as a PDF and will open, automatically, using your default PDF reader.
Close
![]() Is used to close the current project. If the project has unsaved data, a new window opens offering the possibility to save the changes (OK), close the project without saving the changes (No) or maintaining the project open (Cancel).
Is used to close the current project. If the project has unsaved data, a new window opens offering the possibility to save the changes (OK), close the project without saving the changes (No) or maintaining the project open (Cancel).
 This section of the Icon Shortcut Bar relates to the project itself and includes tools from the "File" drop-down menu (Menu Bar).
|
Is used to create a new project. See Creating a New Project. |
|
Is used to open previously created projects. See Open. |
|
Is used to close the current project. If the project has unsaved data, a new window opens and offers the possibility to save it. |
|
Is used to save all modifications in the current project. Operationally speaking, it creates/updates the project’s corresponding .mprj file and sources.
|
Edit & Project section
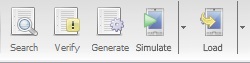 This section of the Icon Shortcut Bar includes tools from the "Edit" and "Project" drop-down menus (Menu Bar).
|
Is used to execute a general search in the project. See Detail of Search. |
|||||||
|
Is used to verify the consistency of the MCL application of the current project. If there are errors/issues, a report window is opened displaying them. |
|||||||
|
Is used to generate the MCL application. If there are errors/issues, a report window is opened displaying them. See Detail of Project Verification Report. The first time you use the "Generate" option, you create a PDK file. Any subsequent “Generate” actions update that PDK file. The PDK file (located in the “Deploy” folder of the project’s directory) is used as a container to install the application outside the MCL-Designer environment (ex: the PDK file can be uploaded into your MCL-Mobility Platform account – in the “Applications” module).
|
|||||||
|
Opens MCL-Simulator. If you click
|
|||||||
|
Is used to send the current project version/application to the device.
•have the compatible MCL firmware installed. •be connected to your PC, via Windows Mobile Device Center or Wifi •have App Desktop open. For more detailed information, see To Load an MCL Application into a Device.
If you click
|
Edit & General section
 This section of the Icon Shortcut Bar relates to some editing options available.
|
Cuts the selected control/screen/process or program. What is cut remains in memory (it can be viewed when clicking the “Undo/Redo History” icon which enables “undo” and “redo” operations). |
|
Copies a selected control/screen/process or program. To complete this operation, the “Paste” option must be used after “Copy”. |
|
Pastes the selected control/screen/process or program that was previously copied/cut. |
|
Cancels the last operation. |
|
Is used to view the last “undo” and “redo” operations list. See Detail of "Undo/Redo History" window below. |
|
Cancels the last “undo” operation. |
Detail of "Undo/Redo History" window
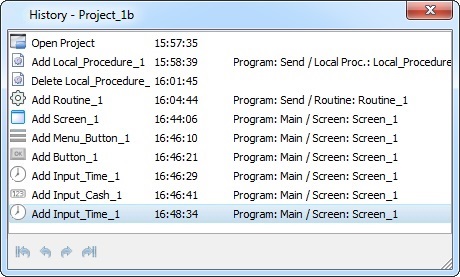
Click the operation you want to return to OR use the icons located at the bottom of the window:
![]() to undo the first operation.
to undo the first operation.
![]() to undo.
to undo.
![]() to redo.
to redo.
![]() to redo the last operation.
to redo the last operation.
![]()
The ![]() is not active if the opened project has been published. See To Publish a Project. Remember that a published project cannot be changed.
is not active if the opened project has been published. See To Publish a Project. Remember that a published project cannot be changed.
To change a published project, open it and create a new version. See To Save a Published Project.
Text section
 This section consists of text alignment tools. It affects every text within any selected control.
|
Is used to “Align Left” any text within the selected control. |
|
Is used to “Align Center” any text within the selected control. |
|
Is used to “Align Right” any text within the selected control. |
|
Is used to “Align Top” any text within the selected control. |
|
Is used to “Align Center” any text within the selected control. |
|
Is used to “Align Vertical Bottom” any text within the selected control. |
Screens section
 This section consists of tools that affect open screens.
|
Is used to display all opened screens in a cascade view, in the Working Area. |
|
Used to open all minimized screens in the Thumbnail Section. |
|
Minimizes all opened screens into the Thumbnail Section, in the Working Area. |
|
Closes all opened screens. |
The Orientation is used to modify the current orientation of the project's screens. Is used to rotate the screen orientation to landscape. This function is only available if the "Orientation" option (in the "Screen Settings" tab of the "Project Properties") is "Auto" and it affects all the screens included in a project. See Screen Settings. |
|
|
The Orientation is used to modify the current orientation of the project's screens. Is used to rotate the screen orientation to portrait. This function is only available if the "Orientation" option (in the "Screen Settings" tab of the "Project Properties") is "Auto" and it affects all the screens included in a project. |
Controls section
 This section consists of tools that affect selected controls in an open screen.
![]()
The rule for all control format commands is that the last control to be selected acts as the template.
|
Is used to align all selected controls with the utmost left side of the last control selected. |
|
Is used to align all selected controls with the utmost right side of the last control selected. |
|
Is used to align all selected controls with the utmost lower part of the last control selected. |
|
Is used to align all selected controls with the utmost top part of the last control selected. |
|
Is used to align all selected controls with the horizontal center with regard to the horizontal center of the last selected control. |
|
Is used to align all selected controls with the vertical center with regard to the vertical center of the last selected control. |
|
Is used to shape all selected controls with the same width/height as the last selected control. |
|
Is used to shape all selected controls with the same width as the last selected control. |
|
Is used to shape all selected controls with the same height as the last selected control. |
|
Is used to evenly space all selected controls horizontally. At least 3 controls must be selected. |
|
Is used to evenly space all selected controls vertically. At least 2 controls must be selected. |
|
Is used to copy the style of selected controls according to the last selected control. At least 2 controls must be selected. |
|
Is used to center all selected controls in relation to the screen. |
|
Is used to center all controls in relation to the screen. |
|
Is used to bring the selected control in front of other controls of the same type. |
|
Is used to send the selected control behind the other controls of the same type. |
Grid section
 The Grid section includes tools that affect the screen grid. These settings can be changed in the “Grid/Colors” tab (located in the MCL-Designer Setup, in the "Tools" drop-down menu). See “Grid/Colors” tab.
|
Is used to turn off the grid. |
|
Turns the grid to dots. |
|
Turns the grid to squares. |
|
Turns off the magnetic grid option. |
|
Is used to turn the magnetic grid option to a 5 pixels width. |
|
Turns the magnetic grid option to a 10 pixels width. |
Zoom section
![]() The Zoom section is used to either "zoom in" or "zoom out" the open screens in the Working Area. You can select a percentage from the drop-down or use the magnifying glass icons (the plus sign to increase the zoom and the minus sign to decrease the zoom).
The Zoom section is used to either "zoom in" or "zoom out" the open screens in the Working Area. You can select a percentage from the drop-down or use the magnifying glass icons (the plus sign to increase the zoom and the minus sign to decrease the zoom).