|
Creating and Editing a Screen |
  
|
Creating and Editing a Screen
|
Creating and Editing a Screen |
|
Overview
Screens are an essential element within a program. Screens can be added to a program, renamed, edited or deleted. Additionally, screens can be repositioned within the program they are used in.
As mentioned earlier (see Creating a New Project), after the project has been created, it automatically generates a program (Main Program) and a screen named “S: Screen_1”. Unlike that first program, this screen can be renamed.
|
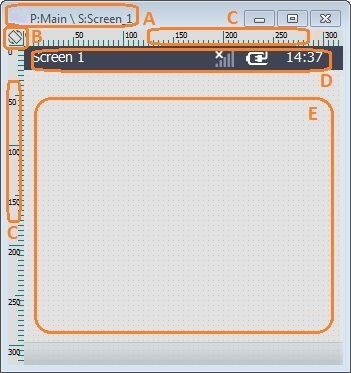
A screen includes the following:
A - The name of the program that contains the screen and the name of the screen itself. It does not appear in the device's screen.
B - A button that modifies the screen's orientation (portrait or landscape). Depending on the current screen orientation, clicking the button changes the screen's orientation. A landscape oriented screen turns into portrait oriented and if a screen has a portrait orientation, clicking the It does not appear in the device's screen.
C - The horizontal and vertical rulers display the pixels in the screen.They are very useful to position controls in the screen. The rulers do not appear in the device's screen.
D - The screen toolbar, which is displayed in the device's screen, contains details that relate to the device as well as the name of the screen. See Detail of "Screen Toolbar".
E - This area contains the controls added from the "Control" tab (see Adding Controls to a Screen). The device's screen consists of this area, along with the screen toolbar. |
To Rename a Screen
Step-by-step
1. Right-click the screen, which is represented in the tree view, and open a menu.
2. In this menu, click the "Edit" option to open the properties window.
3. In the "General" tab of this new window, fill in the Screen Name boxes ("Name"/"Title" options).
![]() "Name" - This option relates to the screen's designation within the MCL-Designer V4 project. It is the designation that appears in the tree view.
"Name" - This option relates to the screen's designation within the MCL-Designer V4 project. It is the designation that appears in the tree view.
"Title" - This option appears in the toolbar of the screen itself.
4. Click ![]() to apply the new names.
to apply the new names.
![]()
It is recommended to always rename the added or duplicated screens. This helps with internal project organization.
To Create a New Screen
Use one of the following methods:
•In the tree view display, right-click the program that should have another screen added to it. Click the “Add Screen” option in the resulting menu.
•In the tree view, right-click the screen you want to copy and click "Duplicate Screen" in the resulting menu. This option duplicates not only the screen itself (with every control, shape, etc.) but also copies every process and "routine in"/"routine out" attached to the selected screen.
2. Whatever the selected option, it opens a properties window. This is where the settings of the newly added screen are defined. See Setting Screen Properties.
To Reposition a Screen (within a Program)
Step-by-step
1. In the tree view, select the screen to reposition.
2. Drag the selected screen to the required position in the tree view.
3. Drop the screen on the required position.
To Delete a Screen
Step-by-step
1. In the tree view, use one of the following methods:
a. Select the screen to be deleted.
b. Use the keyboard's <DEL> key.
c. Confirm the action by clicking ![]() .
.
OR
a. Select the screen to be deleted.
b. Right-click the selected screen.
c. Select the "Delete" option in the resulting menu.
d. Confirm the action by clicking ![]() .
.
Screen Features
•Every added screen is automatically positioned as the last program screen.
•Every time a screen is added, it is displayed in the tree view ("Programs" module) of the project that is being developed.
•Every screen that is added is automatically named "Screen_x", where "x " represents an incremented number.
•When the screen is duplicated, the name remains the same but with a numerical increment.
•Every screen can only contain one "routine in" and/or one "routine out":
The "routine in" is executed prior to the display of screen elements. To add a "routine in", right click the screen representation, in the tree view, that will contain it. In the resulting menu, select the "Routine In" option.
The "routine out" is executed after the screen's controls are validated. To add a "routine out", right click the screen representation, in the tree view, that will contain it. In the resulting menu, select the "Routine Out" option.
Add any necessary processes in the "Routine"tab of the "routine in" and/or the "routine out". See Adding Processes to a Routine, "Routine In", "Routine Out", Local Procedure or Global Event.