|
Screens |
  
|
Screens
|
Screens |
|
Overview
A screen is more than a set of controls. It contains the coded commands (processes) that carry out program functions, the variables that store application data and other controls. Screens provide the interface and interaction between the operator and the application.
Detail of a Screen represented in the Tree View
|
A – Screen “Menu” (within "Main Program")
B – Routine In (within screen “Menu”)
C – Control “Menu_Button_1” (within screen “Menu”)
D – Action “Ready” (within screen “Menu”)
E – Action “Timer” (within screen “Menu”)
F – Action “Barcode” (within screen “Menu”)
G – Action “RFID” (within screen “Menu”)
H – Action “NFC” (within screen “Menu”)
I - Action “Hotkey” (within screen “Menu”)
J – Action “Power” (within screen “Menu”)
K – Action “Validate” (within screen “Menu”)
L - Action “Receive Message” (within screen “Menu”)
M - Action “Custom” (within screen “Menu”)
N - Routine Out (within screen “Menu”) |
Typical Screen Components
Controls (C)
There are 3 types of controls that can be used within a screen: Display Controls, Input Controls and Menu/Selection Controls. See Adding Controls to a Screen.
Routine In (B)
Contains commands (calculations, file operations, database retrieval, etc.) that are executed before the screen is displayed. These commands can also call routines or local procedures within the program where the screen was created or a global procedure. See Working with Routine In.
Actions (D, E, F, G, H, I, J, K, L, M)
Any one of these actions ("Ready", "Timer", "Barcode", "RFID", "NFC", "Hotkey", "Power", "Validate", "Receive Message" and "Custom") can be associated to the screen. What happens after an action is triggered, is defined with the use of processes. At screen level, the most common process is a “Go to” Branch process (see How to Work with Processes). This enables workflow redirection to a specific destination. For instance, to a routine or another screen within the same program. See Associating Actions to a Screen or a Control.
Routine Out (N)
Contains commands (calculations, file operations, database retrieval, etc.) that are executed after all the controls and processes within the screen are validated/executed. These commands can also call routines or local procedures within the program where the screen was created or a global procedure. See Working with Routine Out.
Screen Properties
Contain the general settings that apply to a screen such as “Backlight”, “Beep” “Wallpaper”, etc. See Setting Screen Properties.
Screens in the Tree View
The tree view displayed in the "Programs" module includes the project's screens as well as the controls, actions, routine in/out contained in each screen. The tree view allows for the adding, editing, deleting and properties setting of the elements being displayed. Depending on the element you right-click, the resulting menu offers options related to the selected element:
Available Right-Click Menus
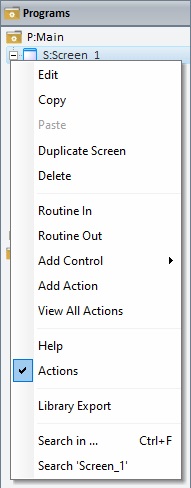
Right-clicking a screen representation in the Tree View ("Programs" module) provides access to a menu with the following options:
|
Edit |
Opens the screen's properties window so you can edit it. See Setting Screen Properties. |
|
Copy |
Copies the selected screen. Use the "Paste" option in the right-click menu of the destination element to complete the operation. |
||
Paste |
Pastes a previously copied control. Only available after the"Copy" operation is performed. |
||
Duplicate Screen |
Duplicates the selected screen with all its features, controls and processes. |
||
Delete |
Deletes the selected screen. |
||
Routine In |
Adds a "routine in" prior to any graphic information being displayed on the screen. Once the screen contains a "routine in", this option is used to to open its properties window for edition. See Working With Routine In. |
||
Routine Out |
Adds a "routine out" that is executed after all the controls and processes within the selected screen are validated/executed. Once the screen contains a "routine out" , this option is used to open its properties window for edition. See Working with Routine Out. |
||
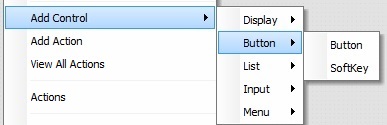
Add Control |
Provides a list of the available controls you can add to the screen. Mouse over the options to open the respective list and select the intended control.
Mouse over the options to open the respective list, select the intended control and, then, fill in the corresponding properties window. To get detailed information on how to fill in these properties windows, refer to each control's chapter. |
||
Add Action |
Allows you to add a compatible action to the selected screen. See Actions Associated to Screens. Click this option and select the intended action in the resulting window. The selected screen's "Actions" tab opens and you can add the required processes to the new action. Conclude by clicking |
||
View All Actions |
Opens a window that displays the screen's actions, controls and processes which are also editable. See Detail of a "View Actions" window. |
||
Help |
Provides direct access to the screen's "Help" tab. |
||
Actions |
Provides direct access to the screen's "Actions" tab. |
||
Library Export |
Allows you to export the current screen into Library. See To Export a Screen to Library. |
||
Search in ... |
Opens the "Search" window. See Detail of Search.
|
||
Search 'xxx' |
Opens the "Search" window. See Detail of Search.
|
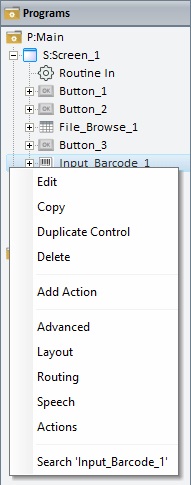
Right-clicking a control displayed in the Tree View ("Programs" module) opens the following menu:
|
Edit |
Opens the selected control's properties window so you can edit it. See Adding Controls to a Screen. |
Copy |
Copies the selected control. Use the "Paste" option in the right-click menu of the destination element to complete the operation. |
|
Duplicate Control |
Duplicates the selected control with all its features. |
|
Delete |
Deletes the selected control. |
|
Add Action |
Allows you to add a compatible action to the selected control. See Actions Associated to Controls. Click this option and select the intended action in the resulting window. The selected control's "Actions" tab opens and you can add the required processes to the new action. Conclude by clicking |
|
This section provides direct access to the tabs of the selected control's properties window. In this case, the selected control is an Input Keyboard so the available options are "Advanced", "Layout", "Routing", "Speech" and "Actions". |
||
Search 'xxx' |
Opens the "Search" window. See Detail of Search.
|
|
If you right-click an action displayed in the tree view ("Programs" module), you will access the "Delete" option.

Right-clicking the "routine in" representation in the tree view of the "Programs" module opens a menu with the following options:
|
Edit |
Opens the properties window of the selected "routine in" so you can edit it. |
Delete |
Deletes the selected "routine in". |
|
Routine |
Opens the "Routine" tab of the properties window directly. See Working with Routines. |
|
Search in ... |
Opens the "Search" window. See Detail of Search.
|
|
Search 'xxx' |
Opens the "Search" window. See Detail of Search.
|
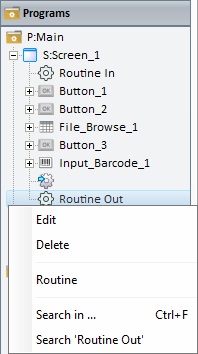
Right-clicking the "routine out" displayed in the tree view ("Programs" module) opens the following menu:
|
Edit |
Opens the properties window of the selected "routine out" so you can edit it. |
Delete |
Deletes the selected "routine out". |
|
Routine |
Opens the "Routine" tab of the properties window directly. See Working with Routines. |
|
Search in ... |
Opens the "Search" window. See Detail of Search.
|
|
Search 'xxx' |
Opens the "Search" window. See Detail of Search.
|
Screens are mostly used in a sequence, meaning, one screen follows another screen. There is, however, the possibility to juxtapose screens and create a pop-up effect.
Follow the steps below to create a pop-up effect using screens:
Step-by-step
The purpose is to enter a product code and view the corresponding product description as a pop up.
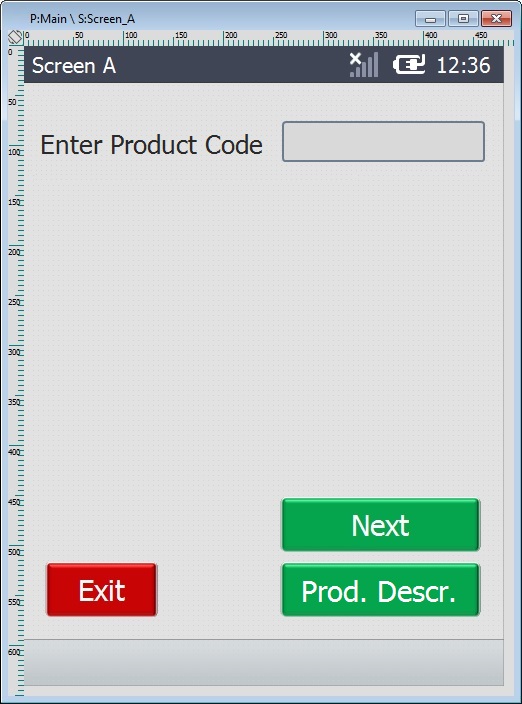
1. Create a screen (ex: "Screen_A") with the required content:
a. Open the screen's properties window and, in the "General" tab, make sure that the "Clear Screen" option is checked.
b. Add the necessary controls to provide information, enter data and redirect the workflow (ex: a Display Text, an Input Keyboard, a Button to exit the application, etc.).
c. Add a button that leads to the screen that will be set as a pop-up (ex: Button "Prod Descr.").
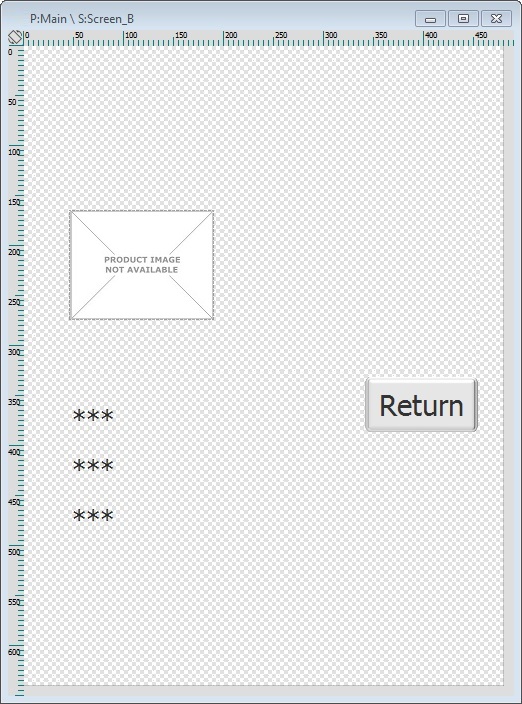
2. Create a second screen (ex: "Screen_B") with content. This content will be displayed on top of the previous screen ("Screen_A"):
a. In the properties window of "Screen_B" ("General" tab), UNCHECK the "Clear Screen" option.
This deactivates all wallpaper related options - the screen will NOT have a background.
b. Add the necessary controls. (Ex: The screen includes a Display Image, a few Display Text controls displaying variable content and a Button to return to "Screen_A" which MUST include a "Go to: <Exit>" process in its "Actions" tab.)
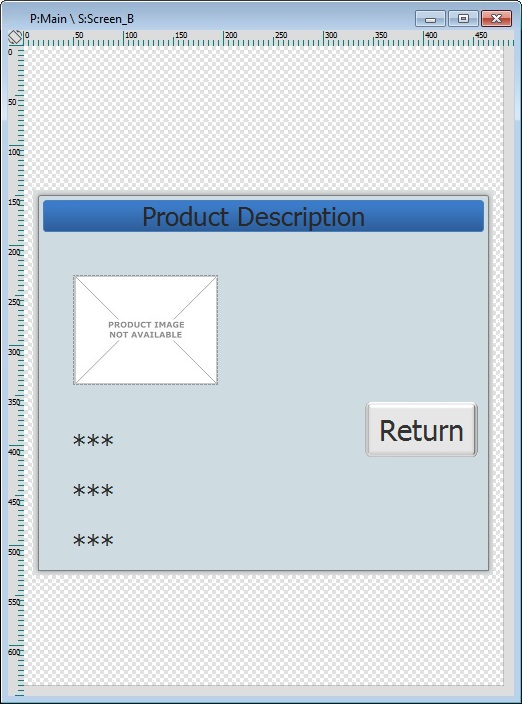
c. Add a Display Shape and edit its style/dimensions according to the type of pop-up you want to display - consider the size, background color, etc. (Ex: The added Display Shape encases all of "Screen_B's" controls and its style includes a header. A Display Text was added on top of that header with the content "Product Description".)
3. Back in "Screen_A", add a "GoSub" process to the "Actions" tab of the Button "Prod Descr." directing the workflow to "Screen_B" (ex: "GoSub: S:Screen_B").
![]() The "GoSub" is the only compatible Branch process you can use to create a pop-up effect.
The "GoSub" is the only compatible Branch process you can use to create a pop-up effect.
This is the expected result (MCL-Simulator images):
|
|
|
|
|
a.The product's code is entered in "Screen_A".
b. The Button "Prod. Descr." is clicked (the "GoSub S: Screen_B" process calls "Screen_B").
c. The content of "Screen_B" is displayed in the form of a pop-up. (The controls included in "Screen_A" are inactive. The focus is on the content of "Screen_B".)
d. The Button "Return" is clicked to close the so called "pop-up" (the "Go to: <Exit>" process returns the workflow to "Screen_A").