|
Navigating the Programs Module |
  
|
Navigating the Programs Module
|
Navigating the Programs Module |
|
![]() The "Programs" module displays a tree view of all the elements contained in the project. It is possible to edit all the displayed elements in the tree view as well as add more within the module.
The "Programs" module displays a tree view of all the elements contained in the project. It is possible to edit all the displayed elements in the tree view as well as add more within the module.
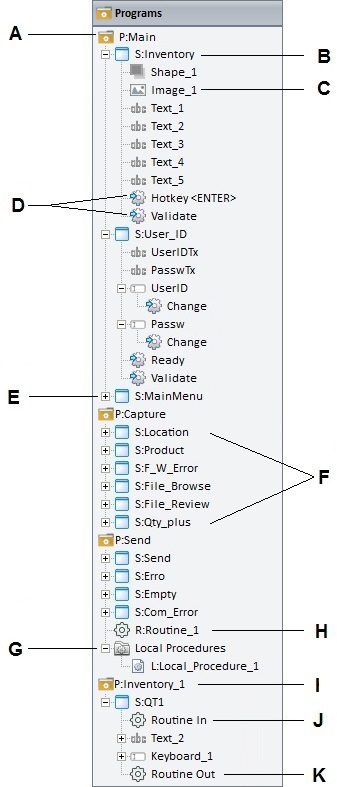
Detail of a Tree View
|
A – Program See Programs. |
B – Expanded Screen |
|
C – Control See Adding Controls to a Screen. |
|
D – Action See Associating Actions to a Screen. |
|
E – Collapsed Screen |
|
F – Screens from a program (in this case, the “P: Capture” application program) See How to Work with Screens. |
|
G – Local Procedure See Local Procedures. |
|
H – Routine See Working with Routines. |
|
I - Locked Element (Identified with a |
|
J - Routine In See Working with "Routine In". |
|
K - Routine Out See Working with "Routine Out". |
•To edit an element displayed in the tree view, right-click it. This opens a menu with the related available options.
•To add a program, right-click a blank space in the "Programs" module or the module's title to access a menu with the "Add Program" option.
As an alternative, you can right-click an existing program and select the "Duplicate Program" option - it will duplicate the selected program with all its elements.
See Programs.
•To add a screen to a program, right-click a program, represented in the tree view, and, in the resulting menu, select the corresponding option.
As an alternative, you can right-click an existing screen and select the "Duplicate Screen" option - it will duplicate the selected screen with all its elements.
See Screens.
•To expand/collapse parts of the tree view - click the plus ![]() or minus
or minus ![]() signs preceding an item to expand or collapse the list of underlying items.
signs preceding an item to expand or collapse the list of underlying items.