|
Working with Receive Data Process |
  
|
Working with Receive Data Process
|
Working with Receive Data Process |
|
Process Purpose
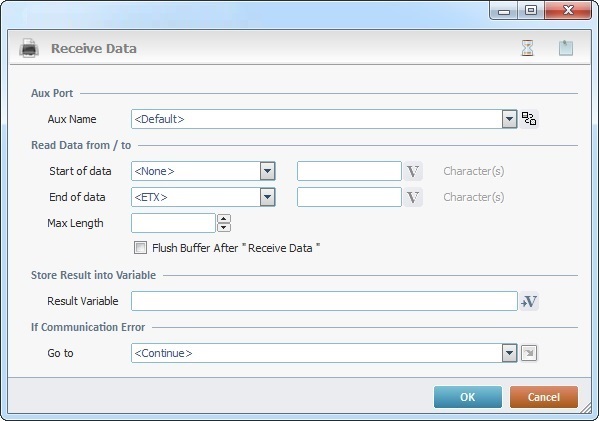
The "Receive Data" process is used to define the structure of the data (type and receiving variables) to be received through a port, from an auxiliary device.
When you add a process, you are required to define its settings. This occurs in the process's properties window which is displayed automatically after having added the "Receive Data" process.
If any subsequent edition is required, double-click the process to open its properties window and enter the necessary modifications.
Proceed as follows:
Aux Port |
|
Aux Name |
Select the auxiliary device profile that will receive the data package from the drop-down. If required, click See To Create an Aux Profile and/or To Edit an Aux Profile.
Remember NOT to select a Serial Port Aux profile if your target device is an Android device. Serial Port type profiles are not supported if used in Android devices. |
Read Data from/to |
|
Start of Data |
Maintain "None" or select the character that identifies the beginning of the received data. See Abbreviations. If you select "Custom", you must define the custom character in the related box which becomes active. Enter the intended character OR click |
End of Data |
Select the character that identifies the end of the received data. See Abbreviations. If you select "Custom", you must define the custom character in the related box which becomes active. Enter the intended character OR click |
Max Length |
If required, define the intended maximum length for the reading buffer (in Bytes). If left blank, the limit is set to 4096 bytes.
Always set a maximum limit to avoid an "Out of Memory" error in the target device(s). |
Flush Buffer After “Receive Data” |
Check this option to empty the reading buffer after the received data package is stored in a variable. |
Store Result into Variable |
|
Result Variable |
Click |
If Communication Error |
|
Go to |
Select a target location from the drop-down list or the
|
![]()
Consider the following:
•If the expected data length is variable, consider using an "End of Data" delimiter in your protocol to clearly identify the end of each message. This allows the "Receive Data" process to easily store the incoming data in a structured MCL-Designer data file, if necessary.
•If the expected data length is static, you can use the "Max Length" option with or without an "End of Data" character. The "Receive Data" process will apply the first rule that occurs, meaning, the data will be read up to the "End of Data" character or until it as reached the maximum defined length, whatever comes up first.
•Using "Maximum Length" as the only condition may cause a performance decrease depending on the data size and/or target device specifications.
Detail of a ![]() window:
window:

"S:Menu" is a screen included in the same program as the process.
"R:Routine_1" is a routine included in the same program as the process.
Use the following recurring icons (located on the upper right corner of the properties window) to execute specific operations:
•Click ![]() to define a time out. See To Define a Time Out for a Print/Aux Process.
to define a time out. See To Define a Time Out for a Print/Aux Process.
•Click ![]() to attach any relevant notes to this process. Click it and enter your notes in the resulting text box. These notes will be displayed in the corresponding "Actions" tab or "Process" window (in the "Notes" field) and in the "Developer Report".
to attach any relevant notes to this process. Click it and enter your notes in the resulting text box. These notes will be displayed in the corresponding "Actions" tab or "Process" window (in the "Notes" field) and in the "Developer Report".
After filling in the required options, click ![]() to conclude or
to conclude or ![]() to abort the operation.
to abort the operation.
The added process is displayed in the corresponding "Actions" tab or "Process" window.
This process uses the following abbreviations:
Abbreviation |
Meaning (hexadecimal) |
STX |
Start of Text (02 hex) |
ETX |
End of Text (03 hex) |
CR |
Carriage Return (0D hex) |
LF |
Line Feed (0A hex) |
![]() If you want to use a label as a target destination, you can use the "Auto-Label" mechanism. This alternative to the "Set Label" process allows you to create a label in the properties window of a process - specifically, in the fields used to define target destinations (ex: the "If Error..." type fields). See To Automatically Create a Label.
If you want to use a label as a target destination, you can use the "Auto-Label" mechanism. This alternative to the "Set Label" process allows you to create a label in the properties window of a process - specifically, in the fields used to define target destinations (ex: the "If Error..." type fields). See To Automatically Create a Label.
![]()
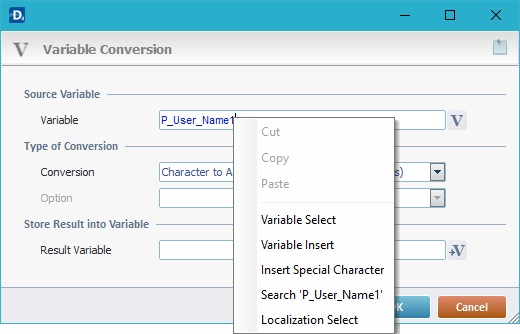
Use the right-click in MCL-Designer's input boxes to access some related options as well as the general "Cut", "Copy"; "Paste"; "Search" actions (active/inactive according to the current context).
Ex: If you right-click the "Variable" input box (included in a "Conversion's" properties window), you are provided with general editing/search actions and other more specific options such as "Variable Select" (see "Variable Select"); "Variable Insert" (see "Variable Insert"); "Insert Special Character" (see To Insert Special Characters into a Control's Text Input Field) and "Localization Select" (see Localization List).
If you right-click another input box, it may provide other possibilities.