Working with Speech Output Process
Process Purpose
The Speech Output process is used to define specific "prompts" (what the operator hears and how he hears it).
When you add a process, you are required to define its settings. This occurs in the process's properties window which is displayed automatically after having added the "Speech Output" process.
If any subsequent edition is required, double-click the process to open its properties window and enter the necessary modifications.

Proceed as follows:
Prompt |
|
Text to Speak |
Enter the text to be heard by the operator OR click Use the |
Playing Mode |
|
Priority |
If checked, the execution of this prompt will have priority over any other defined speech output, meaning, it will override/cut off any other speech output occurring at the same time (this includes speech output that is already running when this process is executed and the speech output that is supposed to start at the same time as this prompt). If you leave it unchecked, and there is another speech output (that was executed before), the prompt will be appended to that speech output, it will be executed as soon as the other one is finished. |
Background |
If checked, the execution of this prompt does not affect the application's workflow. If you leave this option unchecked, the application will pause until the prompt is finished. |
Talk Over |
If checked, the operator can speak/provide input while the prompt is being executed. This means that the next speech input instruction being executed defines the input sync mode. If you leave it unchecked, no speech input will be accepted during the prompt, the operator can only speak/provide input after the prompt is over. |
After filling in the required options, click ![]() to conclude or
to conclude or ![]() to abort the operation.
to abort the operation.
The added process is displayed in the corresponding "Actions" tab or "Process" window.
If required, use ![]() (located on the upper right corner of the "properties" window) to open a "Localization" window where you can edit the text element within that control or add translations to it. See Localization.
(located on the upper right corner of the "properties" window) to open a "Localization" window where you can edit the text element within that control or add translations to it. See Localization.
![]()
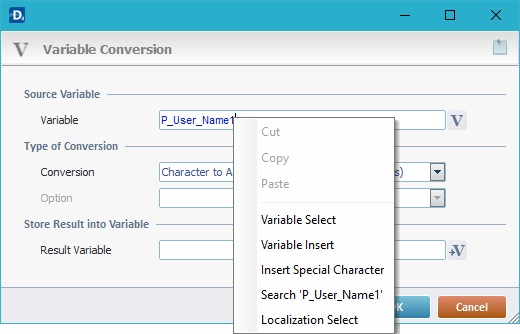
Use the right-click in MCL-Designer's input boxes to access some related options as well as the general "Cut", "Copy"; "Paste"; "Search" actions (active/inactive according to the current context).
Ex: If you right-click the "Variable" input box (included in a "Conversion's" properties window), you are provided with general editing/search actions and other more specific options such as "Variable Select" (see "Variable Select"); "Variable Insert" (see "Variable Insert"); "Insert Special Character" (see To Insert Special Characters into a Control's Text Input Field) and "Localization Select" (see Localization List).
If you right-click another input box, it may provide other possibilities.
