Overview
Devices are added, one by one, to a Device Group within a site. There are two methods to add a device:
| • | Standard “Add Device” |
This method implies two main steps:
1. Adding an entry to the device list with the device's information/details.
2. Installing MCL-Agent in the device to establish a connection to the account.
The second step is essential to conclude the adding operation. Creating an entry in the device list does not automatically establish a link between the account and the device. The added entry will be static until a device with the same SSN (and containing the MCL-Agent) is connected to the account.
| • | "Pairing" |
This method consists of adding a pin, provided by the device's MCL-Agent, to the account to establish a link between the account and the device. For more information, see Pairing a Device.
![]()
Before adding a device (with either the standard or pairing method), make sure a device group with the appropriate settings (meaning compatible with the device) exists. If there is none, you must create it. For more information, see Creating a Device Group.
To install MCL-Agent in a Windows Mobile device, see Installing MCL-Agent into a Windows Mobile device.
To install MCL-Agent in an Android device, see Installing MCL-Agent into an Android device.
When entering the "Devices" page for the first time, you view the following message:
![]()
Click ![]() to go directly to the “New Device Group” page and create a Device Group. For more detailed information, see Creating a Device Group.
to go directly to the “New Device Group” page and create a Device Group. For more detailed information, see Creating a Device Group.
Standard "Add Device"
Step-by-step
1. To access the Devices sub-module, click ![]() , in the "Control Panel" and, in the resulting row below, click
, in the "Control Panel" and, in the resulting row below, click ![]() .
.
This opens a "Devices" page.

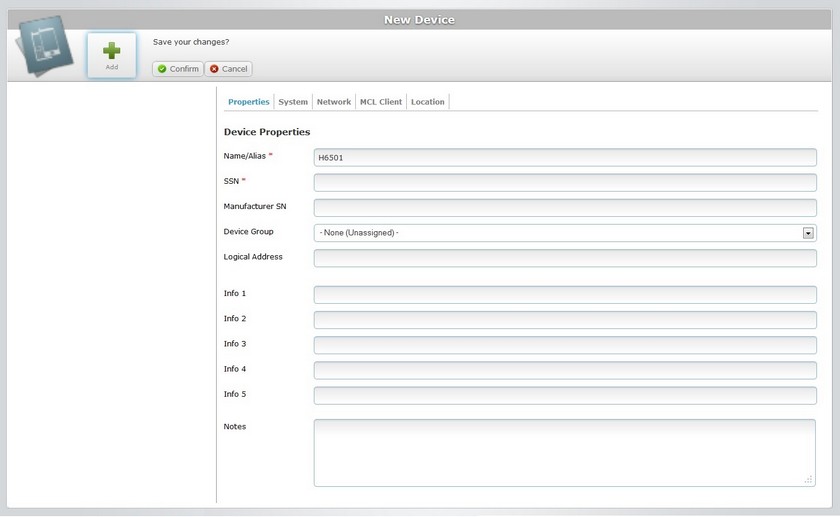
2. Click ![]() to open the"New Device" page, in "edit mode". The "Properties" tab is open, by default.
to open the"New Device" page, in "edit mode". The "Properties" tab is open, by default.

3. Fill in the information regarding the new device (the fields marked with an asterisk are mandatory):
Name/Alias * |
Enter the device's name. |
SSN * |
Enter the device's SSN - this information is provided by the device, via the MCL-Agent installed in the device. |
Manufacturer SN |
Enter the device's SN - this information is displayed in the physical device and is unique to each device. |
Device Group |
Select the destination device group from the drop-down list. Ensure that a compatible device group is created beforehand. See Creating a Device Group. |
Logical Address |
If required, enter the MCL Logical Address (Subnet ID – Device ID) (MCL Client Version 3 legacy). |
Info 1 > Info 5 |
These field labels can be customized - their designation can be modified according to the information they are supposed to retrieve. (See "Editing Site Details" - Custom Field Labels tab.) Enter the requested information. |
Notes |
If relevant, add notes regarding the device. |
The other tabs (System, Network, MCL-Client and Location) do not provide any information at this point and are not editable. The information to be displayed in each tab is automatically entered, as soon as the device establishes a connection with the account, via MCL-Agent. (This product must be installed in the device and is responsible for the communication between device and the account.)
For more details on the information that will be contained in these tabs, see Device Details.
4. Click ![]() to save the entered information.
to save the entered information.
The added device is displayed in the "Devices" page.
![]() Once the connection between the added device and the account is established, verify the device's current status. If it is "disabled", change it. See Changing a Device's Status.
Once the connection between the added device and the account is established, verify the device's current status. If it is "disabled", change it. See Changing a Device's Status.