|
Counter Operations |
  
|
Counter Operations
|
Counter Operations |
|
Overview
The section "Counters" manages the counter profiles that are required to implement MCL-Mobility Platform's "Business Analytics Service" in an MCL-Designer project so that the resulting MCL application sends the intended metric information to the corresponding counter created in the MCL-Mobility Platform account.
Refer to the MCL-Mobility Platform User Guide for more detailed information on this MCL service.
You can add, edit, import, copy or delete unnecessary counter profiles, as needed.
Follow the link that describes what you want to execute:
To Create a Counter Profile (check below)
To Import/Sync a Counter Profile
Counter profiles can be created in the project's "Project Properties" window, specifically, in its "Platform Services" tab but, also, in the properties window of counter related processes (ex: the "Update Metrics" process included in the "Platform Services" process group - see Working with Update Metrics Process) via the ![]() button (when available). This button provides access to the table with the project's counters.
button (when available). This button provides access to the table with the project's counters.
![]()
When creating a counter profile, during project development, make sure that the target MCL-Mobility Platform account includes the corresponding counter with the same settings.
Specifically, the alias and the defined metrics for the counter profile (at MCL-Designer level) MUST MATCH the alias and defined metrics of the target counter created in your MCL-Mobility Platform account. Otherwise, the MCL application will NOT be able to connect/provide the data to the intended counter.
For more detailed information on counter management within the MCL-Mobility Platform, refer to the MCL-Mobility Platform User Guide.
![]() To ensure the alias/metrics match between the MCL-Mobility Platform counter and the counter profile you need to have in your MCL-Designer project, we recommend you create the intended counter in your MCL-Mobility Platform account beforehand and, then, execute an "Import/Sync Counters" operation in MCL-Designer in the "Platform Services" tab of the Project Properties which will, automatically, create a matching counter profile in MCL-Designer. See To Import/Update a Counter Profile.
To ensure the alias/metrics match between the MCL-Mobility Platform counter and the counter profile you need to have in your MCL-Designer project, we recommend you create the intended counter in your MCL-Mobility Platform account beforehand and, then, execute an "Import/Sync Counters" operation in MCL-Designer in the "Platform Services" tab of the Project Properties which will, automatically, create a matching counter profile in MCL-Designer. See To Import/Update a Counter Profile.
The following step-by-step describes how to create a counter profile manually:
Step-by-Step
1. Use one of the following methods to access a table with the project's counter profiles:
•Open the "Project" menu (located in the Menu Bar), select the "Properties" option and open the "Platform Services" tab.
•Click ![]() (if available) in the properties window of counter related processes (ex: the "Update Metrics" process.)
(if available) in the properties window of counter related processes (ex: the "Update Metrics" process.)
2. Click ![]() (located to the right of the table) to open the properties window of the new counter profile.
(located to the right of the table) to open the properties window of the new counter profile.
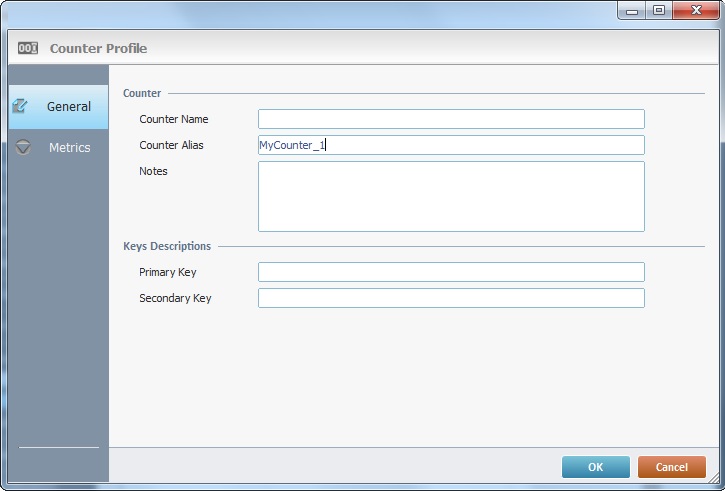
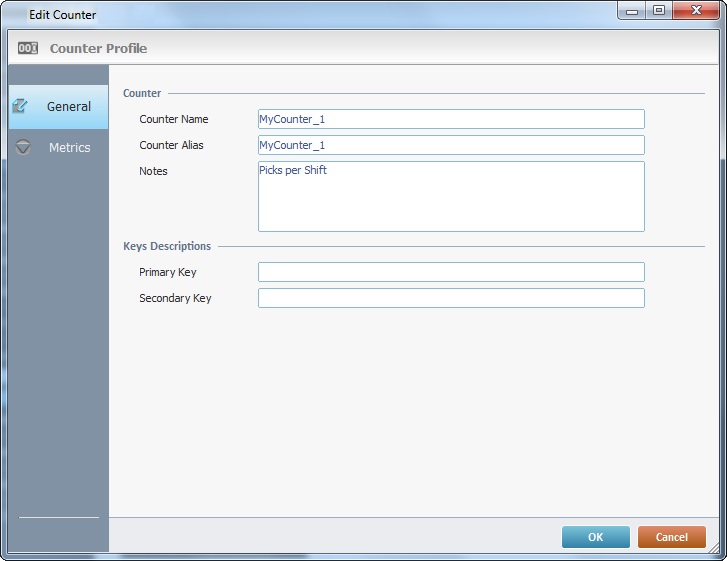
3. In the "General" tab, fill in the following options:
Counter |
|
Counter Name |
Define the name for the counter you want to target with this profile. Use the same name of the corresponding counter that is supposed to exist in the MCL-Mobility Platform account and will receive the metric data from the MCL application, for organizational purposes. |
Counter Alias |
Define the alias for the counter you want to target with this profile - this counter alias MUST match the alias of the target counter created in your MCL-Mobility Platform account. MCL-Designer provides an alias suggestion ("MyCounter" plus an incremented number) - you can keep it as long as you ensure that the corresponding counter in the MCL-Mobility Platform account will also have the same alias. |
Notes |
If necessary, add notes concerning the new counter profile. |
Key Descriptions |
|
If required, you can define a primary and a secondary key to further filter/group the metric data, meaning, you can define attributes to be applied to the metric values so they are aggregated according to those specific attributes. For instance, If you define “Operator ID” as a “Primary Key“, the metric values will be grouped according to the operator that generated them. |
|
Primary Key |
If required, define a primary key to be used as a filter for the metric data. The metric values will be grouped according to the primary key. |
Secondary Key |
After having defined a primary key, you can filter the metric values even further by defining a secondary key to be applied to the primary key aggregation. |
4. Open the "Metrics" tab.
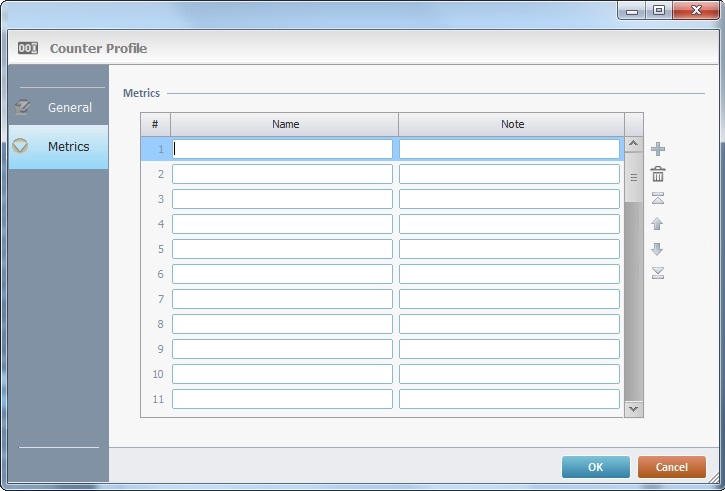
5. Fill in the table to define the metrics you require for this counter profile:
Metrics |
|
Name column |
Enter the name of the metric(s) you want the MCL application to feed the target counter with.
The name of the metric(s) you define here (for the new counter profile) MUST MATCH the name of the metric(s) defined for the target counter in the MCL-Mobility Platform account. |
Note column |
If necessary, add information about the corresponding metric. |
6. Click ![]() to conclude or
to conclude or ![]() to abort the operation.
to abort the operation.
To Import/Sync a Counter Profile
As an alternative to the manual creation of a counter profile within MCL-Designer, it is possible to import/synchronize a counter that already exists in your MCL-Mobility Platform account.
Operationally speaking, you are not, actually, importing a counter into MCL-Designer, you are creating a counter profile with the settings of a counter that already exists within your MCL-Mobility Platform account - the "import/sync counter" operation ensures that the resulting counter profile in MCL-Designer and the target counter in the MCL-Mobility Platform are a match, in terms of alias, metrics, keys, etc.
Step-by-Step
1. Use one of the following methods to access a table with the project's counter profiles:
•Open the "Project" menu (located in the Menu Bar), select the "Properties" option and open the "Platform Services" tab.

•Click ![]() (if available) in the properties window of counter related processes (ex: the "Update Metrics" process).
(if available) in the properties window of counter related processes (ex: the "Update Metrics" process).

2. Click ![]() (located below the table). This opens a window with the counters that exist in the MCL-Mobility Platform account that your MCL-Designer subscription is currently associated to.
(located below the table). This opens a window with the counters that exist in the MCL-Mobility Platform account that your MCL-Designer subscription is currently associated to.
![]()
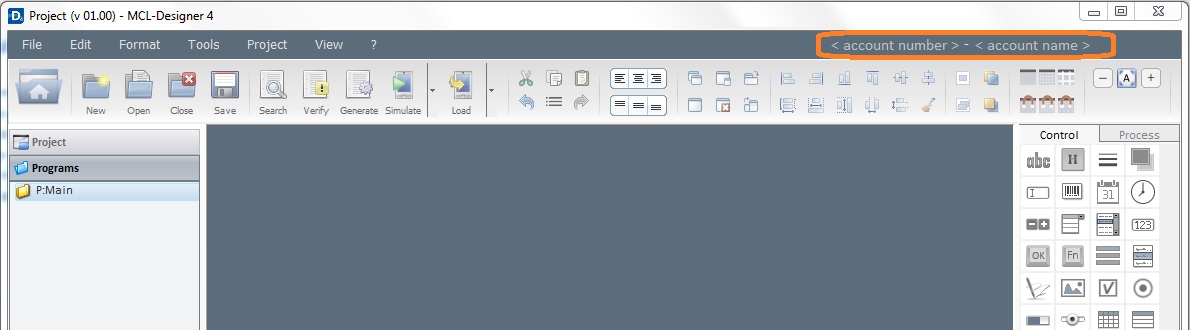
If you have multiple MCL-Mobility Platform accounts and corresponding subscriptions associated to the current MCL-Designer V4 instance, make sure you are connected to the MCL-Mobility Platform account that includes the intended target counter(s). Before clicking ![]() , check the account number displayed to the right of the Menu Bar.
, check the account number displayed to the right of the Menu Bar.
If it is not the right account, switch to the intended one (see The Switch Account Menu) so you can access the counters you need.
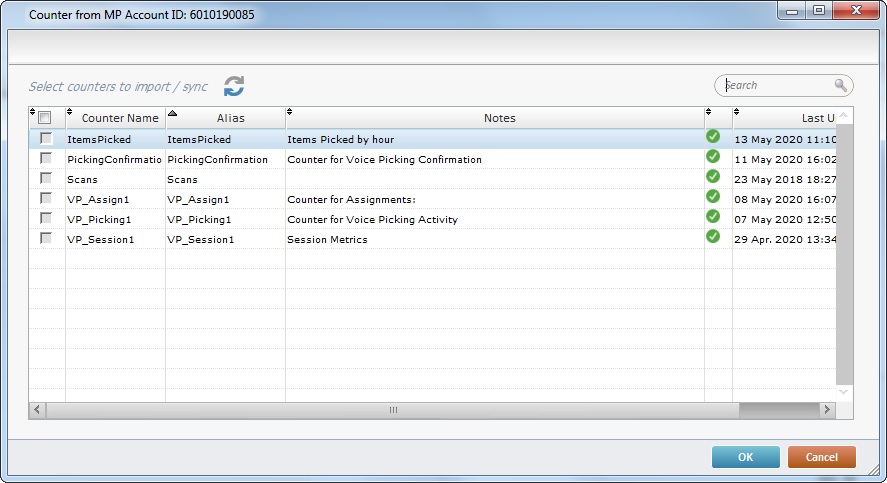
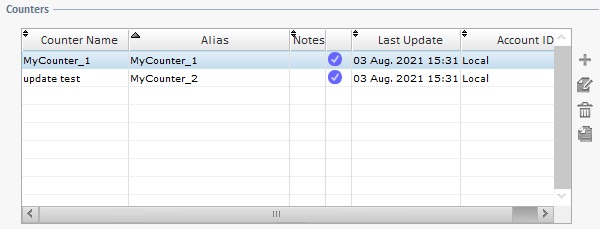
This window displays the following information/options:
•The number of the MCL-Mobility Platform account that includes the listed counters (displayed on the window's upper left corner).
•A ![]() button to refresh the available counter list.
button to refresh the available counter list.
•a search box ![]() to filter the counter list.
to filter the counter list.
•a table with the counters available in the currently associated MCL-Mobility Platform account/subscription and info on each counter:
Selection column |
This column is used to select the intended counter. Checking the column title's box |
Counter Name column |
The counter's name. |
Alias column |
The counter's alias. |
Notes column |
Information about the corresponding counter. |
counter status column |
The symbol that reflects the counter's current status. Ex: |
Last Update column |
The date/time of the last counter update executed in the MCL-Mobility Platform account. |
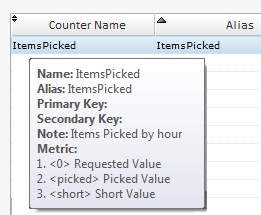
•If you mouse over a counter row, you get that counter's setup information (ex: associated metrics, primary/secondary keys, etc.):
3. Select the intended counter(s).

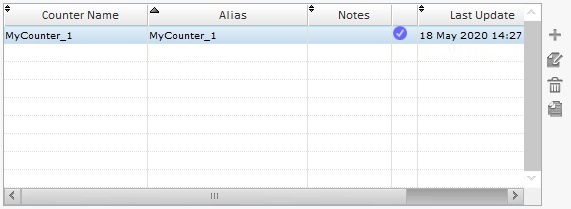
4. Click ![]() to apply. This creates a counter profile targeting the selected counter which is, immediately, available in the MCL-Designer's table with the project's counter profiles:
to apply. This creates a counter profile targeting the selected counter which is, immediately, available in the MCL-Designer's table with the project's counter profiles:

If necessary, edit the available counter profiles.
![]()
Make sure your edition does NOT affect the mandatory match of alias and metrics between the counter profile and the targeted counter in your MCL-Mobility Platform account.
If you have to edit these specific settings in the MCL-Designer environment, make sure your edition is duplicated at MCL-Mobility Platform level, meaning, perform the same changes in the target counter as well - otherwise, the MCL application will NOT be able to identify/send the defined data to the intended counter.
Step-by-Step
1. Use one of the following methods to access the table with the project's counter profiles:
•Open the "Project" menu (located in the Menu Bar), select the "Properties" option and open the "Platform Services" tab.
•Click ![]() (if available) in the properties window of counter related processes (ex: the "Update Metrics" process).
(if available) in the properties window of counter related processes (ex: the "Update Metrics" process).
2. Select the counter profile you want to edit and click ![]() (located to the right of the table) to open the corresponding properties window.
(located to the right of the table) to open the corresponding properties window.
3. Edit the available tab(s) as required.
If you need help with the edition, check the step-by-step included in To Create a Counter Profile.
4. Click ![]() to apply your changes.
to apply your changes.
It is possible to duplicate an available counter profile.
Step-by-Step
1. Use one of the following options to access a table with the project's counter profiles:
•Open the "Project" menu (located in the Menu Bar), select the "Properties" option and open the "Platform Services" tab.
•Click ![]() (if available) in the properties window of counter related processes (ex: the "Update Metrics" process).
(if available) in the properties window of counter related processes (ex: the "Update Metrics" process).
2. Select the counter profile you want to copy and click ![]() .
.
This opens a properties window for the duplicate - its options are filled in with the same information as the original counter profile.
The duplicate's name is the same plus an incremented number.
3. Edit the "General" and/or "Metrics" tab, as needed.
If you need help with the edition, check the step-by-step included in To Create a Counter Profile.
![]()
After the "copy counter profile" operation, make sure that the duplicate's alias/metrics are a match to the intended target counter.
It is possible to delete unnecessary counter profiles.
Step-by-Step
1. Use one of the following to access the table with the project's counter profiles:
•Open the "Project" menu (located in the Menu Bar), select the "Properties" option and open the "Platform Services" tab.
•Click ![]() (if available) in the properties window of counter related processes (ex: the "Update Metrics" process).
(if available) in the properties window of counter related processes (ex: the "Update Metrics" process).
2. Select the counter profile(s) you want to delete and click ![]() (located to the right of the table).
(located to the right of the table).
3. Click ![]() (located to the right of the table).
(located to the right of the table).
4. Click ![]() in the resulting window to confirm the deletion.
in the resulting window to confirm the deletion.